EyalSec User Guide
What is EyalSec?
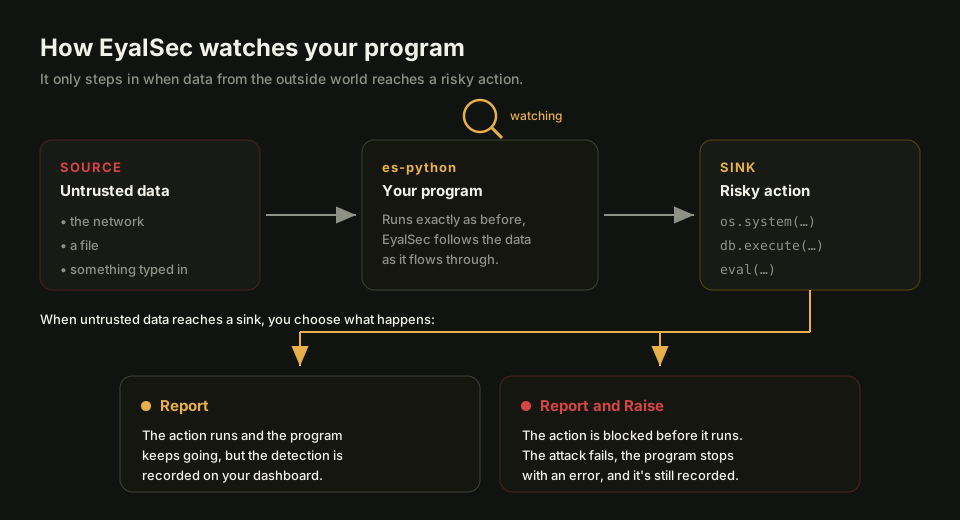
EyalSec is a secure Python. You install it next to your normal Python
and run your programs through it exactly as you do today; nothing in your code
has to change. We call the EyalSec runtime es-python, and you run it in place
of python.
While your program runs, es-python quietly watches for one specific danger: untrusted data (a.k.a. taint), meaning data that came from the outside world, reaching a risky action in your code. Where that data enters is called a source: a network socket, a file, standard input, the program's environment variables and command-line arguments, or foreign code (Python code on disk that another user can write to). The risky action it flows into is called a sink: things like running a system command, opening a file, or running a database query. Untrusted data reaching a sink is how most real-world hacks happen, and that is exactly the pattern es-python is built to catch.
When es-python sees untrusted data reach a sink, it can do one of two things, and you choose which:
- Report: let the program keep running, but record what happened on your dashboard so you can see it.
- Report and Raise: record it on your dashboard and stop the risky action
before it runs (the program gets a
RuntimeErrorinstead), so an attack is blocked, not just recorded.
You can read more about the difference, and when to use each, in Report mode vs Report and Raise mode.
You manage everything from one website: your dashboard. It shows which of your machines have es-python installed, what they have detected, and lets you change your settings, all in one place.
es-python is one of several products
The same idea is available for other languages and runtimes too, and your dashboard has a separate events list for each product your account has. The two this guide covers are:
- es-python, the secure Python described above. This is the one you install yourself, and the rest of this guide is written around it.
- es-chromium, a secure browser that tracks untrusted data inside the page and reports DOM-based cross-site-scripting flows.
Which products your account has is set for you, per account. es-python is
enabled by default; es-chromium and the other products are enabled on request,
and once one is, you add its machines yourself from the Machines page, the same
way you add an es-python machine. To have a product turned on, contact
support@eyalsec.com. Your Events page shows one list per product you have, so
a list you do not see is a product that is not enabled rather than a missing
feature. Everything else in this guide (events, filters, severity, suppression,
quotas) applies to every product the same way.
The three pieces
EyalSec is made of three parts that work together:
- The es-python runtime: the secure Python you install on each of your machines. It runs your code, watches for untrusted data reaching a sink, and sends what it finds back to your dashboard. See Running es-python.
- The web dashboard: the website where you sign in to add machines, watch events, set up filters, and change how each machine behaves. Start at Quick start: your first 10 minutes.
- The API: a JSON interface that does everything the dashboard does, so you can automate EyalSec or pull your data into your own tools. See the API reference.
Quick start: your first 10 minutes
This is the fastest path from zero to seeing your first event: create an account, add a machine, install es-python (the EyalSec runtime), switch on the sources you want watched, run a script through it, and watch what it finds appear on your dashboard. Plan on about ten minutes.
1. Create your account
- Open EyalSec and go to the Register page.
- Pick a username, enter your email address, and choose a password (typed twice to confirm). Your password must be 8 to 72 characters. Tick the box to accept the Terms of Service and Privacy Policy.
- Submit. EyalSec emails a verification link to that address; click it to activate your account. That signs you in and drops you on your dashboard.
Verifying your email activates your sign-in and nothing else. A new account carries no machines and no event allowance until a plan is set up for it, and the dashboard says so at the top of every page. Email sales@eyalsec.com to book a live demo and have your plan sized; your limits then apply immediately, with nothing to reinstall. See Plans & roles for what a plan sets.
The rest of this walkthrough assumes your plan is active.
2. Log in (next time)
Clicking the verification link signed you in, so you can skip this for now. Next time you visit, go to the Login page and enter your username and password. If you later turn on two-factor authentication, you'll also be asked for a 6-digit code. See Accounts & signing in.
3. Add a machine
A machine is any host where you'll run your code through es-python: your laptop, a server, a container.
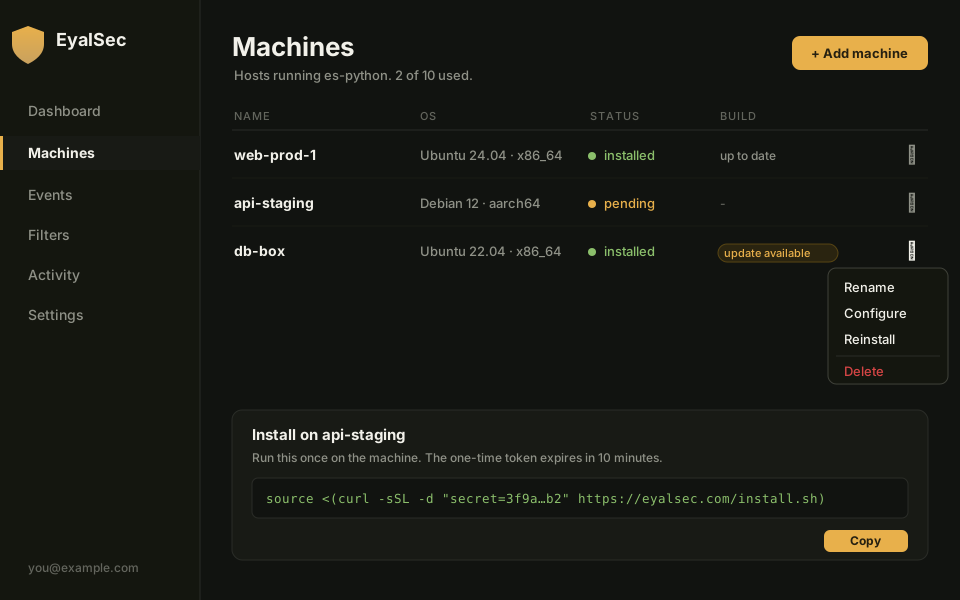
- Go to the Machines page. If your account has more than one product, pick es-python under Product.
- Give it a Name (anything memorable, 1 to 128 characters).
- Pick the Distro (for example Ubuntu 24.04, Debian 12, RHEL 9, Amazon
Linux 2023, Fedora, or Arch) and the Arch (
x86_64oraarch64) that match the host. - Pick the Python version for this machine (3.13 is the default; 3.9 to 3.14 are supported, and the list shows the ones available for the distribution and architecture you picked).
- Click Add machine. The machine appears with a created status pill, waiting for you to install es-python on it.
More on the full machine lifecycle is in Machines.
4. Copy the install command
Click Install on the machine's row (status created, OS set). The page shows a single install command. Select Copy to grab it. It looks like this:
printf ' preparing your build on the server (this can take up to a minute)...\n'; T="$(mktemp)" && chmod 600 "$T" && curl -sSL -d "secret=<token>" --data-urlencode "glibc=$(ldd --version 2>/dev/null | head -1)" --data-urlencode "arch=$(uname -m 2>/dev/null)" 'https://eyalsec.com/install.sh' -o "$T" && . "$T"; ES_RC=$?; rm -f "$T"; (exit "$ES_RC")
The <token> is a one-time secret that's valid for 10 minutes, so run it
soon. If it expires, click Install again for a fresh command.
5. Run the installer on the host
Paste the command into a terminal on the machine itself and run it. It:
- installs the es-python runtime under
~/opt/eyalsec/, - drops
es-pythonand theeyalsechelper command into~/.local/bin/, and - adds that directory to your
PATH(in the current shell, and in your shell's startup file:~/.bashrc, plus~/.zshrcor fish's config where you use them).
The machine's status moves created → pending → installed. Once it shows
installed (a green, blinking pill) on the dashboard, you're ready to go:
es-python works immediately, in that same terminal, with no extra step.
The installer retries and resumes an interrupted download on its own. If the install still fails, click Install again for a fresh command and run that.
Note: the command runs the installer inside your current shell (the
. "$T"part), which is what makeses-pythonavailable right away. If you instead pipe the script to bash (curl ... | bash), the install still works, but you'll need to open a fresh terminal (or runsource ~/.bashrc) afterwards.
Privacy notice: es-python may capture values from your program's memory (including secrets and personal data) when untrusted data reaches a monitored sink. Only run it on systems and data you are authorized to monitor.
6. Switch on detection and run your script
Every taint source is off until you switch it on, so a fresh machine reports nothing yet. On the Machines page, click Configure on the machine's row and set the sources you want watched (for example socket and file) to On, or set them once for every machine on the Filters page. What each source watches is explained in Machine configuration. Source changes apply to programs started after the change.
Then, anywhere you'd normally type python, type es-python instead:
es-python your_script.py
Your program runs exactly as before, but now es-python is watching for untrusted data reaching a risky action and reporting what it sees. You don't need to change a single line of code. For more ways to run it, see Running es-python.
7. Watch events appear
Back on the dashboard, open the Events page.
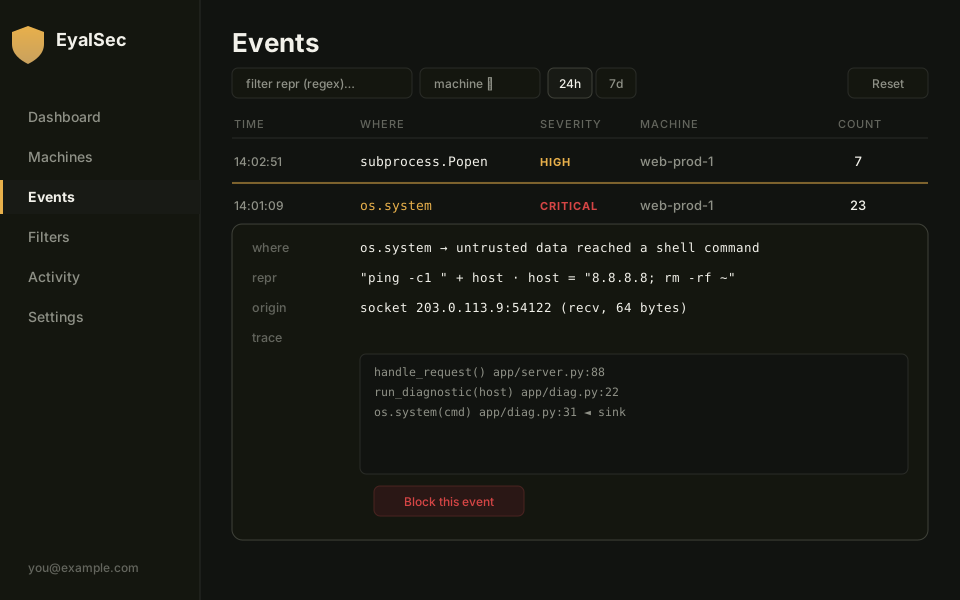
As your program runs, detections show up here, newest first. Each row is one kind of event; the count rises each time the same thing happens again, and the severity column tells you at a glance how serious it looks. Click a row to expand it and see the details. Full coverage of the table, filters, and the detail pane is in Events.
If nothing shows up yet, give it a few seconds (events are sent in the
background), make sure you ran your script with es-python and not python,
check that at least one source is switched on for the machine, and confirm the
machine reads installed on the Machines page.
8. (Optional) Turn on Report and Raise mode
So far es-python is in Report mode: it records events but never interferes
with your program. When you're ready to actually block a risky action, switch
that machine to Report and Raise mode; then es-python stops the action (your program
gets a RuntimeError) instead of just recording it.
You set this up per machine in the Configure modal by adding a Raise rule. The how-to is in Machine configuration, and the difference between the two modes is explained in Report mode vs Report and Raise mode.
Note: Raise rules must be enabled on your account. If they aren't, adding one is
rejected with "Raise rules are not enabled for your account. Ask an
administrator to enable them." To have it turned on, contact sales@eyalsec.com.
That's the whole loop: install once, run with es-python, watch your events. From
here, explore Settings to secure your account,
Filters to cut noise, and the Dashboard overview
for a high-level summary. If you get stuck, see Getting help.
Accounts & signing in
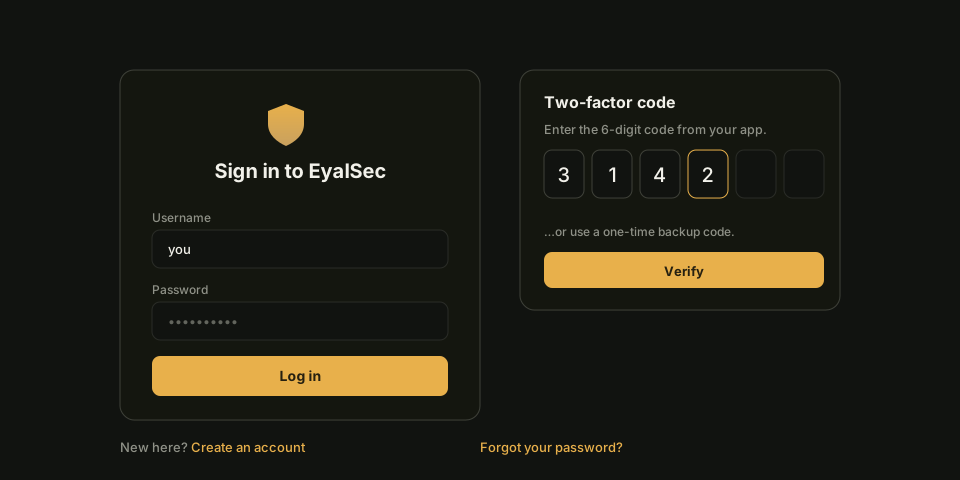
Everything in EyalSec lives behind your account. This page walks through creating an account, signing in, the two-factor (2FA) check at login, signing out, and what to do when you forget your password.
Register
New here? Create an account from the Register page.
- Go to
/register/. - Pick a username and enter your email address.
- Enter a password, then type it again to confirm (it must follow the Password rules below).
- Tick the box to accept the Terms of Service and Privacy Policy. Depending on how the site is configured, a background human check (CAPTCHA) may also run.
- Submit.
You're not signed in yet: EyalSec emails a verification link to the address
you gave, and your account stays inactive until you click it. Following that link
activates the account, signs you in, and drops you on your dashboard at
/scanner/, so keep a working email handy at signup. See
Quick start: your first 10 minutes.
Verifying your email activates your sign-in, not your access. A self-signup account starts with no machines and no event allowance, and the dashboard shows a banner saying so: you can sign in and look around, but adding a machine is refused until a plan is set up for the account. Email sales@eyalsec.com to book a live demo and have your plan sized. New limits apply immediately, with nothing to reinstall. See Plans & roles for what a plan sets.
Some accounts are created from an invite link instead. An invite link opens a special registration page that works the same way (username, password, and accepting the terms); it simply starts the account with the settings an admin chose for you, already provisioned, and the link expires 24 hours after it was created.
Log in
Already have an account? Sign in from the Login page.
- Go to
/login/. - Enter your username and password.
- Submit.
If two-factor authentication is turned on for your account, you'll be sent to a second screen to finish signing in (see The 2FA challenge below).
For your protection, repeated failed sign-in attempts from the same place are slowed down. If you've been locked out by too many wrong guesses, wait a little and try again, or use Forgot password to reset.
The 2FA challenge
If you've enabled two-factor authentication, logging in takes one extra step.
After your username and password are accepted, you land on the 2FA page
(/login/2fa). There you can enter any one of:
- The current 6-digit code from your authenticator app,
- One of your backup codes (in the form
xxxx-xxxx-xxxx-xxxx). Backup codes are not case-sensitive, and each one works only once, or - If you turned on email sign-in codes, a 6-digit code emailed to your recovery address from that page.
Enter one of those and you're in. Backup codes are your safety net for when you don't have your phone, so keep them somewhere safe. You can turn 2FA on, see how many backup codes you have left, and generate fresh ones from Settings: your account.
Log out
To sign out, use Sign out at the bottom of the dashboard sidebar. This clears your session and returns you to the login page. Signing out is a good idea on shared or public computers.
Forgot password
Can't remember your password? You can reset it by email.
- Go to
/login/forgot. - Enter your username or email address and submit. For privacy, EyalSec always shows the same neutral message here; it won't tell you whether an account exists, so nobody can use this page to fish for valid accounts.
- If the account exists and has an email on file, a 6-digit code is emailed to it. That code is valid for 15 minutes.
- On the verify page (
/login/forgot/verify), enter your username or email, the 6-digit code, and your new password twice. The new password must meet the Password rules; that's checked before the code is, so fix any password problem first. - On success, your old codes are used up and you're sent to the login page.
Note that resetting your password does not sign you in automatically. Once the reset succeeds, log in normally with your new password.
To set or update the recovery email used here, see the email card in Settings: your account. Without an email on file there's nowhere to send the code, so add one before you need it.
Password rules
The same rules apply everywhere you set a password: when you register, change it in Settings, or reset it after a forgot-password. Your password must:
- Be 8 to 72 characters long.
- Not be a well-known common password (a blocklist of weak, easily guessed passwords is rejected).
If a password is turned down, you'll see a message telling you which rule it broke; adjust it and try again.
Still stuck signing in? Email support@eyalsec.com.
Settings: your account
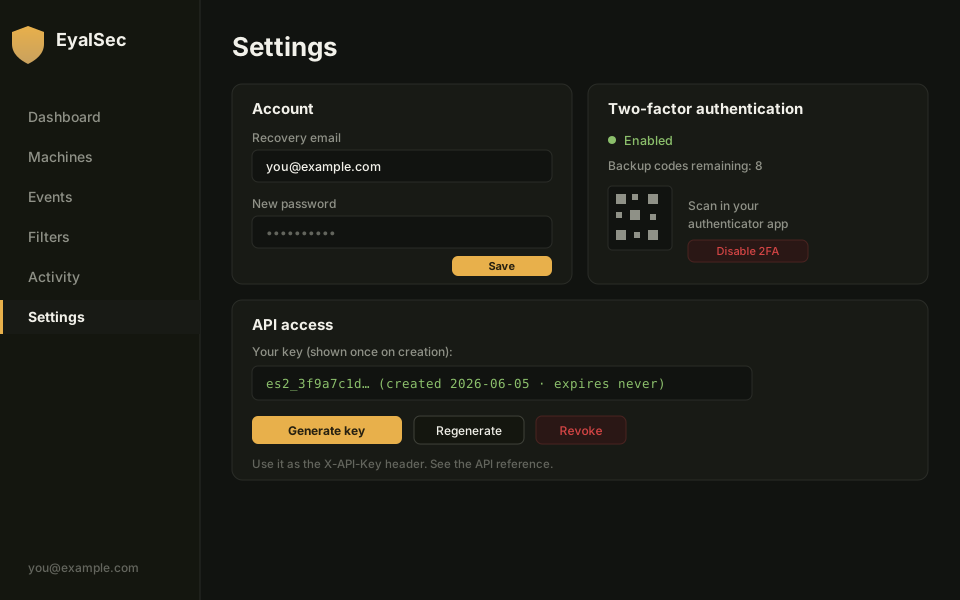
The Settings page (/scanner/settings) is where you manage your own account:
your recovery email, your display time zone, your password, two-factor
authentication, your API key, billing, and deleting the account. Each area is a
separate card, described below.
Change your email
Your email is the address EyalSec uses to send you a password-reset code if you ever forget your password (see Forgot password).
- Open the Account card.
- Type a valid email address, or leave the field blank to remove the one on file.
- Enter your current password (and, if 2FA is on, a 2FA code).
- Click Save email.
Setting or changing the address takes one extra step: EyalSec emails a confirmation link to the new address, and the change only takes effect when you click it. Until then the old address stays in place. This proves you control the inbox before it becomes your recovery address; if you had an old address on file, it also gets a heads-up notice about the requested change. The confirmation link expires after 24 hours. Only one change can be pending at a time: a new request replaces the pending one, and you have to wait a few minutes after one confirmation email before asking for another.
Removing the address (saving an empty field) happens immediately, and any pending confirmation link is cancelled.
We recommend keeping a working email here so the Forgot password flow can reach you. Without one, there's nowhere to send a reset code.
Time zone
The Time zone card sets the zone that event, activity and dashboard times are shown in. Auto (the default) follows your browser. Pick a zone and click Save time zone.
Change your password
To change your password from the Change Password card:
- Enter your current password.
- Enter your new password, then type it again to confirm.
- Click Update password.
The new password must follow the Password rules: 8 to 72 characters, and it can't be a common password.
Two-factor authentication
Two-factor authentication (2FA) adds a second step at login: after your password, you also enter a one-time 6-digit code from an authenticator app on your phone. It's the single best thing you can do to protect your account. The Two-Factor Authentication card shows your current status and the actions below.
Enable 2FA
- Click Enable 2FA. EyalSec shows a QR code (and a manual key you can type in by hand if you can't scan).
- Scan the QR code with an authenticator app (such as Google Authenticator, 1Password, Authy, or similar).
- Enter the current 6-digit code the app shows, to prove the setup worked, and your current password.
- Click Verify & enable.
The moment 2FA turns on, you're shown 10 one-time backup codes. These are shown only once; copy them and store them somewhere safe (a password manager is ideal). Each backup code works a single time and is your way back in if you ever lose your phone. At login you can use either a 6-digit code or a backup code; see The 2FA challenge.
Status card
When 2FA is on, the card shows Enabled along with Backup codes remaining: N so you can tell at a glance how many you have left. When it's off, the card prompts you to turn it on.
Regenerate backup codes
Running low on backup codes, or think they may have leaked? Regenerate them to get a fresh set of 10, again shown only once. Generating a new set replaces the old one, so your previous backup codes stop working.
Disable 2FA
You can turn 2FA off from the same card. Disabling it clears your saved authenticator secret and your backup codes, so your account goes back to password-only login.
Email sign-in codes
Besides the authenticator app, there is a separate Email sign-in codes card: a one-time 6-digit code sent to your recovery email at sign-in. If you also use an authenticator app, the emailed code is an extra fallback; if you don't, the emailed code becomes your second factor on its own. It needs a recovery email on file (set one in the Account card first), and you can turn it on or off there at any time by confirming your password.
API access
An API key lets your own scripts and tools talk to the EyalSec dashboard API directly, without logging in through the website. A full-access key gives the same access your account has, so treat it like a password. You can have one key at a time. For the endpoints you can call with it, see the API reference.
Generate a key
- Open the API access card.
- Optionally set an expiry date (a future date), or leave it blank for a key that doesn't expire.
- Optionally tick Read-only for a key that can only read (GET requests) and never change anything.
- Enter your current password (and, if 2FA is on, a 2FA code).
- Click Generate API key.
You're shown the full key once. It starts with es2_ followed by a long random
string, like this:
es2_Qm3xV8rT1kLp9ZcW4nYb7HsJ2dFg6AeU0oRiXtNvKw5
Copy it now; the full key is shown only once. If you lose it, you'll have to make a new one.
View your key's details
After a key exists, the card shows its metadata, never the full secret again. You'll see:
- A short prefix so you can recognize it (for example
es2_Qm3x…), and whether it is read-only or full access. - When it was created and when it expires (if you set an expiry).
- When it was last used, and from which IP address.
- A sample
curlcommand showing how to send it.
You send the key in a request header named X-API-Key:
curl -H "X-API-Key: es2_Qm3xV8rT1kLp9ZcW4nYb7HsJ2dFg6AeU0oRiXtNvKw5" \
  https://eyalsec.com/api/get_all_machines/
See the API reference for the full list of endpoints, request bodies, and example responses.
Regenerate or revoke a key
- Regenerate replaces your current key with a brand-new one (shown once). The old key stops working immediately, so update anything that was using it.
- Revoke turns off API access entirely until you generate a new key.
Billing
The Billing card's Manage billing button opens the billing portal for your subscription, where you can update your payment method and download invoices. If your account has no subscription billed there, it takes you to the Pricing page instead.
Delete your account
The Danger Zone card permanently deletes your account and everything in it: machines, events, filters and rules. Enter your password, click Delete my account and confirm. This cannot be undone.
A note on re-entering your password
Some sensitive actions ask you to re-enter your current password even though you're already signed in. This is a deliberate extra check so that nobody who walks up to your open session can quietly weaken your account. You'll be asked for your password to:
- Change your email
- Enable or disable two-factor authentication, and turn email sign-in codes on or off
- Regenerate your backup codes
- Generate, regenerate or revoke your API key
- Delete your account
When 2FA is on, changing your email and generating an API key also ask for a 2FA code.
Need a hand with any of this? Email support@eyalsec.com.
Machines
A machine is one computer (a laptop, a server, a container) where you run your code through es-python, the EyalSec runtime. The Machines page is where you add a machine, install EyalSec on it, and keep it up to date. Everything a machine detects shows up under Events, attributed to that machine.
You manage machines from Machines in the left sidebar.
What you can do here
- Add a new machine for any product on your account, and for es-python pick its operating system and Python version.
- Get a one-time install command and run it on the host.
- Watch a machine move through its status lifecycle as it installs.
- Rename, reinstall (to take a newer build), configure, uninstall, or delete a machine.
- If es-chromium is enabled on your account, add and name an es-chromium PC the same way (see Add an es-chromium PC).
Add a machine
-
Pick the Product this machine runs. The dropdown lists the products enabled on your account, and the fields after it change to match: es-python installs onto a host and needs to know which one, every other product needs only a name. If only one product is enabled for you there is nothing to choose and the dropdown is not shown.
-
Give it a Name: anything from 1 to 128 characters that helps you recognize the host (for example
prod-web-1ormy-laptop).The steps below are es-python's. For any other product, skip to step 6.
-
Pick the Distro (the Linux distribution it runs):
- Ubuntu 24.04 LTS
- Ubuntu 22.04 LTS
- Ubuntu 20.04 LTS
- Debian 13 (trixie)
- Debian 12 (bookworm)
- Debian 11 (bullseye)
- RHEL / Rocky / Alma 9
- Amazon Linux 2023
- Fedora (latest)
- Arch Linux (rolling)
-
Pick the Arch (the processor architecture):
x86_64(most servers and desktops) oraarch64(ARM machines, such as AWS Graviton or a Raspberry Pi). Every distro is offered for both. -
Pick the Python version the machine should run. The default is 3.13. Versions 3.9 through 3.14 are supported, and the list is filtered to the ones actually available for the distribution and architecture you picked, so it can change when you change either. This is the version of the es-python runtime the machine installs.
-
Click Add machine.
The new machine appears in the table with a created status, ready to install.
How many machines you can add is a per-account limit set by your plan, counted
per product. If you hit the cap you will see a message like "Machine limit
reached (N). Contact sales@eyalsec.com to upgrade your plan." An account with
no plan yet cannot add machines at all. See Plans & roles for
the limits, and email sales@eyalsec.com to raise yours.
A note on socket-only machines
You may still see a socket-only badge on some older machines. A socket-only machine runs a slimmer version of the runtime that watches network data only: it cannot watch the file, stdin, foreign, or env sources, so on such a machine only the socket source is live and the other four toggles do nothing. See Running es-python for what each source watches.
Socket-only is no longer a choice you make when adding a machine: new machines are always created with the full-instrumentation build. The badge and behavior remain only for machines created under the older option.
Status lifecycle
Each machine moves through three states, shown as a colored pill in its row:
- created (gold): the machine exists in your account but EyalSec is not yet installed on the host. You add a machine in this state.
- pending install (amber): the install command has been handed out and the machine is in the middle of installing. If an install is interrupted it stays here; click Install again for a fresh command (see Run the installer). For an es-chromium PC this state also covers "installed but not opened yet", which is normal and not a failure.
- installed (green, gently blinking): EyalSec is installed and the machine can report events.
created → pending install → installed
If the installer hits an error it cannot recover from on the host, it reports it and the pill reads failed. Click Install again for a fresh command once the cause is fixed.
Row badges
Once a machine is installed, its row can show a few badges next to the status pill:
- Build badge: whether the machine is running the latest EyalSec build. up to date means it is on the current build; newer build available means a newer build exists, and reinstalling the machine picks it up (see Reinstall).
- Python badge: the Python version this machine runs (for example 3.13).
- Socket-only badge (MODE: socket-only): shown when the machine is a socket-only machine.
- ⚠ old copy running (warning): an old copy of es-python, from a previous install of this machine, is still running somewhere and phoning in with a credential that has since been revoked. Its events are not accepted. Restart those programs under the latest install to clear it.
- ⚠ clone (warning): the machine's runtime reported an identity mismatch, for example the same install appearing from a second computer, or signs of tampering. Worth investigating; reinstalling issues a fresh credential.
Set the OS if it is missing
If a machine was added without an operating system, its OS chip reads not set (click to set) in amber. Click it, pick the Distro and Arch (the same lists as when adding a machine), and click Save. You need the OS set before you can install, because EyalSec ships a build matched to that exact distro and architecture.
Get the install command
For a created machine that has its OS set:
-
Click Install on the machine's row.
-
EyalSec shows a one-line install command that looks like this:
printf ' preparing your build on the server (this can take up to a minute)...\n'; T="$(mktemp)" && chmod 600 "$T" && curl -sSL -d "secret=<token>" --data-urlencode "glibc=$(ldd --version 2>/dev/null | head -1)" --data-urlencode "arch=$(uname -m 2>/dev/null)" 'https://eyalsec.com/install.sh' -o "$T" && . "$T"; ES_RC=$?; rm -f "$T"; (exit "$ES_RC") -
Click Copy to copy it.
The <token> is a one-time secret that is valid for 10 minutes. It can
only be used once. If it expires or you need a fresh one, click Install
again to get a new command.
The panel also carries an authorization statement (you own or are authorized to monitor this machine), ticked by default. A command is only issued while it is ticked. The command on screen shows the token partly masked, so a screenshot does not leak it; Copy copies the real one.
Add a machine for any other product
For every product other than es-python and es-chromium, choose it under Product, type a Name, and click Add machine. The install panel then shows two things:
- Environment: the machine's permanent token (
ES2_TOKEN), masked, with a Reveal button. It does not expire, so treat it like a password. - Install command: a one-line command carrying a one-time secret that is valid for 10 minutes, with a hint underneath saying where to run it.
Clicking Install on the row again issues a fresh command without adding another machine.
Add an es-chromium PC
If es-chromium is enabled on your account, choose it under Product, type a Name, and click Add machine. If es-chromium is not in the dropdown it is not enabled for you; see Plans & roles.
There is no distro, architecture or Python version to pick: there is a single published build, and the EyalSec browser brings its own runtime. The row that appears is named by you, exactly like an es-python machine, and that name is what its events are attributed to on the es-chromium view. It is also shown inside the browser itself, so you can tell which machine a running browser reports as.
Click Install on the row for a copy-paste command to run on that PC. The secret in it is one-time, exactly like es-python's, and clicking Install again issues a fresh one.
An es-chromium row moves through the same three states as any other machine, with one difference worth knowing: it reaches installed when the browser is first opened, not when the installer finishes. A browser that is installed but has not been opened yet sits at pending install, and that is normal rather than a failure, however long it lasts.
Two things an es-chromium row does not have: a Set OS step and a build badge, because there is one build and no target to choose; and an Uninstall command in the row menu, because that command removes es-python specifically. To remove a browser, Delete the machine here and remove the application from the PC the way you would any other.
Your machine limit is counted per product, so es-chromium PCs use their own allowance and never eat into your es-python slots.
Run the installer
Run the copied command on the host itself (in a terminal on that machine). The installer:
- installs the EyalSec runtime to
~/opt/eyalsec/, - drops the
es-pythonlauncher and theeyalsechelper command into~/.local/bin/(for packages, see Installing packages), - adds
~/.local/binto yourPATH: in the current shell (the command runs the installer inside your shell, which is what makes that possible) and persistently via your shell's startup file (~/.bashrc, plus~/.zshrcor fish's config where you use them).
As it runs, the machine's status moves from created to pending install and then to installed.
It installs into your home directory, so you do not need root or sudo.
The download is large, so the installer retries on its own and resumes an interrupted download from where it stopped. If the install still fails, the machine stays in pending install (or shows failed); click Install again for a fresh command and run that. The old command's one-time token is already spent, so running it a second time is refused.
Once the status turns green, run your programs with es-python instead of
python, right away, in the same terminal. (Only if you ran the installer by
piping it to bash do you need a fresh terminal or source ~/.bashrc first.)
Remember to switch on the taint sources you want watched (see
Machine configuration); every source is off until you
do. See Running es-python for how to use it.
Rename
To rename a machine, open its kebab menu (the ⋮ icon on the row) and choose
Rename. The new name can be up to 128 characters. Renaming is purely
cosmetic; all of the machine's existing events stay attributed to it.
Reinstall (taking a newer build)
Reinstalling is how you update a machine to a newer EyalSec build. When a machine's build badge shows newer build available, reinstall it to pick up the latest build.
There is no separate Reinstall button: click Install on the machine's row, exactly as for a first install. For an installed machine this resets it to created and mints a fresh install command. Run that command on the host to lay down the new build. Your old events are safe: the machine's name, configuration and internal identity are unchanged, so everything it reported before stays attributed to it. The copy already on the host keeps working until the new install starts.
Configure
To change what a machine watches for and how it reacts, click Configure on the machine's row. This opens a modal with Taint sources and Rules sections. This is also where you turn on Report and Raise mode for a machine. See Machine configuration for the full walkthrough.
Uninstall
For an es-python machine, the kebab menu also has Uninstall. Confirm,
and the page shows a one-line command to run on the host. It removes es-python
from the host (the runtime, the launchers and the PATH line), and once the
host runs it the machine and all its events are removed from the dashboard too.
Delete
To remove a machine, open its kebab menu, choose Delete, and confirm.
Warning: deleting a machine removes the machine and all of its events. This is irreversible; there is no undo. If you only want to stop using a machine, you can leave it in place instead; deleting is permanent. Delete does not touch the host: to remove es-python from it as well, use Uninstall.
Report mode vs Report and Raise mode
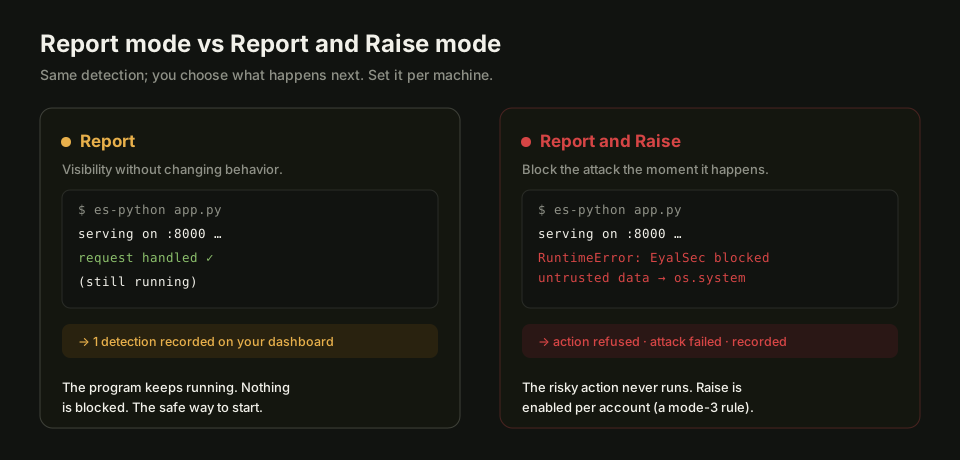
When EyalSec spots something dangerous (untrusted data, that is, data that came from the outside world, also called taint, about to be used in a risky action) it can do one of two things, and you choose which. We call these Report and Report and Raise.
The difference is simple: Report watches; Report and Raise watches and blocks.
Report mode
In Report mode, EyalSec lets your program keep running, but records what it saw on your dashboard. Nothing about your program's behavior changes; it runs exactly as it would under normal Python, and you get a full account of the risky moment under Events: what data was involved, where it came from, and the line of code that triggered it.
Report mode is the default once a source is switched on (every taint source starts off; see Machine configuration). It is the right starting point because it can never break a working program. You get full visibility with zero risk, so you can see what EyalSec finds before deciding whether to block anything.
Use Report mode when you want to:
- see what's happening in an app without changing how it runs,
- watch a new or unfamiliar codebase,
- collect evidence before turning on blocking.
Report and Raise mode
In Report and Raise mode, EyalSec stops the risky action before it runs. Instead of
letting the dangerous operation happen, it aborts it by raising a Python error,
a RuntimeError, at the exact spot. The dangerous thing never happens, so an
attack is blocked. The event is still recorded on your dashboard, exactly as
in Report mode, so you see what was blocked. Report and Raise does both: it
reports and raises.
Here's what that looks like when a program tries to run a system command built from untrusted data:
import os
user_input = get_data_from_the_internet()   # untrusted (tainted) data
os.system(user_input)                        # risky action: a "sink"
Under Report mode this runs and is recorded. Under Report and Raise mode it does
not run. The RuntimeError your program gets is how you know
EyalSec blocked a dangerous operation, and its message names where the data
came from and which sink it reached:
RuntimeError: EyalSec: untrusted data from socket:203.0.113.7:443 reached sink os system
Because Report and Raise mode throws a real Python error, your program sees it like any other exception. If your code already catches errors around that operation, the attack is blocked and your app can recover gracefully. If it doesn't, the program stops there, which is usually exactly what you want when something genuinely malicious is in flight.
Use Report and Raise mode when you want EyalSec to actively defend an app, not just observe it: typically once you've watched it in Report mode and trust what it's detecting.
How you turn each one on
- Report is on by default. Install EyalSec on a machine, switch on the taint
sources you want watched, and run your code with
es-python, and you're reporting. - Report and Raise is set up by adding a mode-3 rule to a machine in the Configure modal. A mode-3 rule tells the runtime to block (raise) on matching events. With no raise rules in place, a machine only reports and never blocks.
See Machine configuration for how to add a mode-3 rule and choose which events it covers.
Account note: Report and Raise mode (mode-3 rules) needs to be enabled on your account. If it isn't, adding a mode-3 rule is rejected with "Raise rules are not enabled for your account. Ask an administrator to enable them." Reporting works on every account. See Plans & roles, and email
sales@eyalsec.comto have it turned on.
Machine configuration
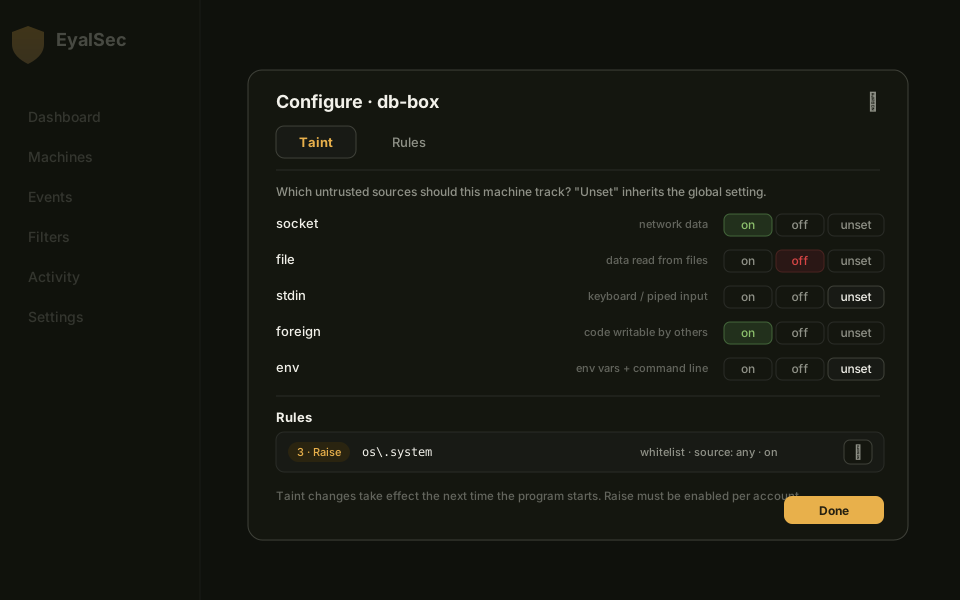
The Configure modal is where you tune what a machine watches for and how it reacts. Open it with the Configure button on a machine's row on the Machines page. The modal has two sections:
- Taint sources: which kinds of untrusted data this machine tracks.
- Rules: what happens with the events a machine detects, from shaping what you see on the dashboard, to dropping noise at the machine, to (when enabled on your account) actually blocking the action on the host.
Changes in the Configure modal auto-save as you make them; there is no Save button.
Global vs per-machine scope
Configuration lives at two levels:
- Global: your account-wide defaults, which apply to every machine. You set these on the Filters page.
- Per-machine: settings for one specific machine, set here in the Configure modal.
A per-machine setting overrides the global default for that machine. So you can set a sensible baseline globally and then tighten or loosen it on individual machines.
The Taint sources section
Taint is untrusted data, meaning data that came from the outside world. A source is where that data enters your program. Each source has its own dropdown, and the modal lists only the sources that machine's product can use. Every source is off until you switch it on, so a new machine reports nothing until you do. For an es-python machine the sources are:
-
socket: data arriving over the network.
-
file: data read from files.
-
stdin: data piped into the program on standard input.
-
foreign: foreign code, meaning code in a file that is writable by another user (a common sign that something untrusted slipped into your code path).
-
env: environment variables and command-line arguments (
sys.argv). -
argv: command-line arguments. On es-python these are tracked by the env source, so switch on env to track them; this toggle has no effect on an es-python machine.
-
make_vuln: values you marked untrusted yourself with the
make_vuln()builtin. -
weak_random: values from the non-cryptographic random generator (
random.getrandbits, which the rest of therandommodule routes through, plusuuid1).uuid4is not included, because it usesos.urandom. The finding fires where the value is used, for example as a token on a network send, not where it was generated. -
hardcoded: credentials found in your source code by a scan when the code is loaded. This is the one source with a steady cost even when nothing is found, so leave it off unless you are looking for it.
On es-python, weak_random and hardcoded are not yet read from this page. Turn them on for a run from the command line instead:
--make-weakrandom-vuln/ES2_MAKE_WEAKRANDOM_VULN=1and--make-secret-vuln/ES2_MAKE_SECRET_VULN=1, or--make-everything-vuln, which includes both. -
db_rows: values read back out of a database. Data your own application stored is still attacker data: it is how stored XSS and second-order SQL injection reach a dangerous operation, arriving long after the request that planted it. Off by default, and it marks a lot on a busy application, which is why it is a source of its own rather than part of socket. Covers the built-in
sqlite3module and the PostgreSQL, MySQL, MariaDB and Oracle drivers that ship with es-python.
The es-python modal also shows two toggles that are not sources, both experimental and off unless you turn them on: identity, which checks your database queries against the schema and their bound parameters and reports defects that need no attacker data at all, and handoff, a mode that lets an EyalSec browser follow a flow from a server response into the page.
A source that a given engine does not understand is simply ignored by that engine, never quietly mapped onto a different one. es-chromium fetches no machine configuration at all, so it has no sources on this page.
The five core sources (socket, file, stdin, foreign, env) show a Read more link into The taint sources, the full reference for what each source watches and the event origins it produces. On a socket-only machine only socket is live (see Machines).
Two spelling traps. The name of a source here is not always the name you scope a rule to (below), and a rule using the wrong form is rejected:
Source on this page Name to use in a rule weak_random(underscore)weak-random(hyphen)db_rowsdbEvery other source uses the same word in both places.
Each source can be set to one of three states:
- On: track this source on this machine.
- Off: do not track this source on this machine.
- Unset (use flag): inherit the global default (or the runtime's command-line setting). This is the default, and it's what lets your global baseline flow through.
Because unset = inherit, you only flip a source to on or off when you want this machine to differ from your global setting. The per-machine choice always wins over the global one. A Set all sources dropdown at the top applies On / Off / Unset to every source in one step.
When it takes effect: taint changes apply on the machine's next process restart. A program that is already running keeps the taint settings it started with; start it again (or start your next program) to pick up the new ones.
The Rules section
A rule decides what happens with a particular kind of event. Each rule has:
- Source: which taint source the rule applies to.
any(the default) covers every source; you can also pick one source from the list, or Custom number… for a number you passed tomake_vuln(). - Event (regex): a regular expression matched against the event, so one
rule can cover a whole family of related events. Leaving it empty means all
events (the same as
.*). - Mode: what the rule does (see below).
- Sanitize: narrows the rule by whether EyalSec found the data made safe: Any (the default), Unsanitized only, Sanitized only or Conditional only. See Suppressed events.
- On: an enable checkbox, so you can switch a rule off without deleting it.
There are four modes. The first two only change what you see; the last two change what the machine does. Every mode acts on the events its pattern matches:
- Mode 2, Show (UI): show only matching events (the default for new rules).
- Mode 1, Hide (UI): hide matching events.
- Mode 4, Don't send (drop): the machine never sends matching events at all, and sends the rest. Dropped events are not recorded (and never count against your event quota). Available on every account.
- Mode 3, Raise (machine): the runtime blocks the matching action on
the host with a
RuntimeError. This is how you turn on Report and Raise mode. Needs Raise enabled on your account.
A product that cannot act on a mode does not offer it: es-chromium, for example, offers only Show and Hide.
A few important notes:
- Display rules (modes 1 and 2) never touch your program or your data. Every event is still recorded; you're just filtering the view. They work on every account.
- Drop rules (mode 4) act at the machine: a dropped event is never sent, never stored, and can't be recovered later. The dashboard asks you to confirm before you add a drop rule with an empty pattern (which drops every event), and shows a standing warning banner while one is active. It also warns you when a drop rule is narrowed by Sanitize, because a dropped event cannot be re-checked later.
Your account starts with two default global drop rules; see Filters.
Plan notes: Mode 3 (Raise) needs the Report-and-Raise capability enabled on your account; without it, creating or updating a mode-3 rule is rejected. Modes 1, 2, and 4 work on every account. See Plans & roles, and email
sales@eyalsec.comto enable it.
Bundled libraries and which copy your app imports
es-python bundles its own copies of a number of third-party libraries. Most of them are instrumented copies that carry a detector (the SQL drivers, the parsers, uvloop), so es-python puts its copy ahead of your application's own packages. That precedence is not a detail: with the bundled uvloop the HTTP surface of an asyncio app is tracked, and with your own copy of uvloop it is not, on the same machine with the same sources armed.
To see which libraries win on a machine, run:
es-python -m _eyalsec_bridge
It prints every bundled library, whether it carries a detector, the version we ship, and whether our copy or yours is the one that imports.
Two environment variables change that, and they are not equivalent:
| Variable | Effect |
|---|---|
ES2_PREFER_APP_LIBS=name[:name…] |
Your copy of the named libraries wins; every other bundled library is untouched. Give a pip name (pyyaml) or an import name (yaml). This is the one to use. |
ES2_NO_BUNDLED_LIBS=1 |
Your copies of all bundled libraries win. Full isolation, and it turns off every detector that lives in one of them. |
Reach for the per-library form. A single version conflict is a reason to prefer your copy of that library, not a reason to disarm the rest.
Either way, if the library you exclude is one that carries a detector, the machine reports it to EyalSec as a coverage gap, so a detector you switched off never looks like a detector that found nothing. Libraries with no detector (cryptography, for example, which we deliberately let your copy win by default so a security pin of yours is never downgraded) are excluded silently, because nothing is lost.
If your application's copy of an instrumented library wins for any other
reason (a virtualenv, PYTHONPATH, pip install --target), the machine
notices that too, at process exit, and reports it the same way.
When configuration reaches the machine
The machine's runtime checks for its latest configuration shortly after startup and then roughly every 30 seconds, so most changes reach a running machine within about half a minute:
- Rules (raise and drop rules) apply on the next event the running program produces.
- Taint changes need a process restart to take effect (as noted above).
So if you add a raise rule, a long-running program starts honoring it within about half a minute. If you change which sources are tracked, restart the program to apply it.
Events
The Events page is where you read what EyalSec has detected across all your machines. Every time your code uses untrusted data (data that came from the outside world, also called taint) in a risky way, an event lands here.
One list per product you have
Events are kept in a separate list for each EyalSec product enabled on your account, so a browser finding never gets mixed in with a server-side one. For example:
| List | What produces it |
|---|---|
| es-python | the EyalSec Python runtime on your machines |
| es-chromium | the EyalSec browser, reporting DOM-XSS flows |
Every other product enabled on your account gets its own list the same way.
You switch between them in the sidebar, not with tabs inside the page. Each link carries its own count, and that count is what the list would actually show you: it already has your monthly quota and the suppressed-events setting applied, so it never promises rows the list cannot display.
You only see the lists for the products enabled on your account. A missing
list is not a missing feature and not an error: it means that product is not
enabled for you. Most accounts have es-python; es-chromium and the other
products are enabled per account on request. If a product you expect is not
there, ask an administrator to enable it, or email support@eyalsec.com.
Turning a product off is reversible and never deletes anything. While it is off, its list disappears and its agents stop reporting; when it is turned back on, the list returns with the events already stored under it. If no product at all is enabled, the Events page says so rather than showing you an empty list.
Filters are per list. Switching lists gives you that list's own filter state rather than carrying your es-python filters over to es-chromium.
Your monthly event quota applies to each list separately, at its full value. A 5000-event quota means up to 5000 es-python events and up to 5000 es-chromium, not 5000 shared between them, so enabling another product adds a whole fresh allowance rather than dividing the one you have. See Plans & roles.
The events table
Events are listed newest first. The table loads 100 rows at a time and fetches more automatically as you scroll, so you can keep going back in time without clicking through pages.
EyalSec doesn't store one row per occurrence; that would flood the page. Instead it groups and counts identical events. Two events are treated as the same when they share the same combination of:
- the machine owner (you),
- the source, where the untrusted data entered (a socket, a file, stdin, the environment, or foreign code),
- where, the display label for what happened, and
- a detail field that further pins down some events (for example the exact file path or regular expression involved), so two otherwise-identical labels stay separate rows.
When a matching event happens again, EyalSec just bumps a counter instead of adding a new row. The count column shows how many times that exact event has fired. A high count is a strong signal: something is hitting that code path over and over.
Each row also carries a severity: one of critical, high, medium, low, or info, computed on the server from what the event shows (for example, how attacker-reachable the data source looks). It's shown as a colored word in its own column so the rows that deserve attention stand out at a glance.
Filtering the list
A toolbar above the table lets you narrow what you see. None of these filters change what's stored; they only change what's displayed.
- Whitelist Repr: show only events whose label (where, the sink column) matches a regular expression (regex) you type, ignoring case. Despite the box's name it is the label that is matched, not the text representation. Filtering happens as you type and the pattern is validated, so a broken regex won't silently do nothing.
- Blacklist Repr: the opposite: hide events whose label matches your regex.
- Quick ranges: one-click buttons for the last 1m / 10m / 1h / 24h / 7d when you don't want to type dates.
- Machine: a dropdown to focus on a single machine.
- Severity: a multi-select to keep only some severities (for example just critical and high).
- Source: a multi-select to keep only events from certain taint sources:
socket/network, file, stdin, environment, command-line args, manual
(
make_vuln), fuzzer, or foreign code.
Advanced search
Under the toolbar is an Advanced search panel. It holds the controls you reach for when the question stops being "what is happening" and becomes "what happened in this window, under this path": the time range, the scope, the condition builder, and your saved searches. The number beside the panel's title counts how many of them are currently narrowing the list, so a collapsed panel never hides a filter from you.
-
From / To: a free-text time range, precise to the second. You can write a time in whichever way is natural:
You type It means 2026-08-10 14:30that minute, in your timezone 2026-08-10that whole day 10/08/2026the same day, written in your locale's order 10 aug 2026 2:30pm/aug 10, 2026 14:30the same minute 14:30,9am,noontoday, at that time 2h ago,-15m,45 minutes ago,7drelative to now in 3 days,+1wrelative to now, forward today,yesterday 09:00,nowkeywords 2026-08-10T14:30:00+03:00an exact instant, offset included 1786554930a unix timestamp (seconds or milliseconds) A bound with no time covers the whole unit it names: From falls to the start of it and To rises to the end. So
To: 2026-08-10runs to the end of that day, andTo: 14:30includes all sixty seconds of 14:30.Each box shows the exact instant it read underneath itself, in your timezone. That echo is worth reading:
08/10/2026is August 10th to some readers and October 8th to others, and the box tells you which one it used. If a box holds something it cannot read, it turns red, says so, and the list keeps showing the last range you gave it rather than quietly dropping the bound. -
Scope: pin the list to one path (on es-chromium, one page host), matched as
is,ends withormatches regex. Events that carry no path at all are excluded unless you tick include events with no path. -
Conditions: build a query out of field / operator / value rows, joined by all or any, with a Not toggle per row. Text switches to the same query written out as one line, which is what the
q=parameter in the URL carries. -
Saved searches: see below.
Your filter choices are saved in the page's URL. That means you can bookmark a filtered view, share the link, or reload the page and land right back where you were.
Filter by tag
Every event carries one or more impact tags: the vulnerability class of the
flow, shown as coloured pills beside the sink. sqli, xss,
command injection, path traversal and so on. They answer what an attacker
gets out of a flow, which the sink name alone does not.
The Tag dropdown narrows the list to one class. It applies to every view.
Right-clicking an event offers the same thing for the classes on that row: Filter: sqli arms the dropdown, and Block this tag: sqli saves a rule that hides the class from the current view until you remove it on the Filters page.
A class is not stored on the event, it is worked out from the sink and the source when the page is built. Filtering on a rare class therefore searches backwards through your history rather than jumping straight to matches, so the list can show "searching" for a moment before the first row appears.
The dropdown lists every class, including any you have blocked. Choosing a class you have blocked gives an empty list: the two rules apply together, and one hides what the other asks for. Unblock it on the Filters page to see those events again.
Opening a row for detail
Click any row to expand it in place and see the full story behind the event. Only one row is open at a time; opening another closes the first. The detail pane can include:
- Where: the display label for what happened (visible to everyone).
- Repr created and Repr found: text representations of the data, from when it was created and where it was found being used.
- Stack trace: the call stack at the moment of detection.
- Origin: file metadata about where the data came from: file type, permissions, size, owner, and timestamps.
- Extension (es-chromium only): the browser extension whose code produced the finding, by name and version, with its extension id underneath. The same name appears as a small tag on the collapsed row, so you can tell at a glance which findings came from an installed extension rather than from the page itself. EyalSec learns the name from the extension's own manifest the first time that extension runs in a monitored browser; until then the row shows the extension id, which is what identifies it in the Chrome Web Store.
Every event shows its label (where), a text representation, the stack trace,
and the file origin. To turn noisy detections into standing rules, use the
Filters page.
Suppressed events
EyalSec checks whether the untrusted data was actually made safe before it reached the risky operation. When it can prove that (for example the value was correctly escaped for the grammar the operation parses, or the payload contains nothing that could break out of it), the event is marked suppressed and kept out of your default view. Nothing is deleted; it is only hidden.
A Show control above the table picks what you see:
- Live only (the default): the events EyalSec could not prove safe.
- Suppressed only: just the ones it could.
- All events: both together, with suppressed rows marked Suppressed. The detail pane's Sanitization section says why a row was suppressed.
The badge next to the control tells you how many suppressed events exist, so a quiet list never leaves you wondering whether it is quiet because nothing happened or because everything was filtered away. Suppression applies to every list, not just es-python.
Suppression is deliberately conservative: when EyalSec is not sure, it leaves the event visible. Some findings only get their severity capped rather than being hidden, because the evidence limits the impact without eliminating it.
Labels, notes and saved searches
Once you start triaging, three things help you keep your place:
- Labels: create your own colored labels (Manage labels) and tag events with them. The label dropdown then filters the list down to one label.
- Notes: leave a comment on an event, so the next person (or you, next month) knows why it was looked at and what was decided.
- Saved searches: in the Advanced search panel, Save stores the current filter combination under a name so you can return to it in one click. A saved search is a page state you come back to; the filters active badge next to Reset is a different thing, a standing rule from the Filters page applied to every query.
Each row also carries an actions menu, opened with the ⋮ button on the row or by right-clicking it. Alongside labelling and commenting, it offers one-click rule shortcuts: Block this sink and, where the row names a source, Block this source. These turn the event you are looking at into a standing rule without retyping its details; you review and undo them on the Filters page.
Where this fits
Events are the raw detections. To turn them into standing rules, like always hiding a known-safe pattern, dropping noise at the machine, or blocking a dangerous action at runtime, use Filters for global rules and Machine configuration for per-machine rules and Raise behavior. For a high-level summary instead of the full list, see the Dashboard overview.
Filters
Filters are standing rules that shape what shows up across your whole account. Where Events lets you narrow a single view on the fly, the Filters page holds the rules that apply everywhere, every time.
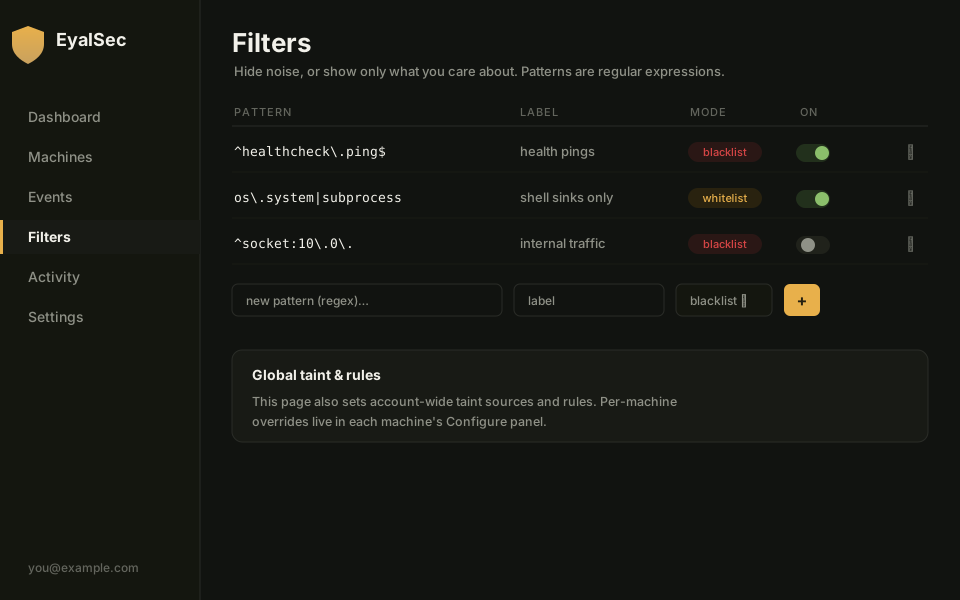
There is one Filters page per product on your account. If you have more than one product, tabs at the top switch between them (es-python, es-chromium, and so on). Each page opens with a one-line description of the product and, where it applies, a note on what that product's configuration cannot do (es-chromium, for example, does not fetch machine configuration, so on its page everything only filters what the dashboard shows).
Blocked events
The first section lists what you have blocked for this product. You block an event from the Events page: right-click a row (or use its ⋮ menu) and choose Block this sink, Block this source (offered when the row names a source), or Block this tag. Each block hides the event and everything like it from the dashboard. Each row in the list shows:
- What: the block's label.
- Scope: what the pattern is matched against: sink (every event at this sink), source (every event from this taint source) or tag (every event carrying this impact tag). A block that applies to every product is marked all engines.
- Pattern: the pattern that is matched.
- State: a toggle between blocking and paused, so you can switch a block off without deleting it.
- Unblock: removes the block. Matching events reappear on the Events page.
Blocks affect display only: they change which events you see on the dashboard, never which events get recorded. Nothing is ever lost; a blocked event is still there once you pause or remove the block.
Global taint and rules live here too
Below the blocked list, Sources & rules hosts your global taint settings and global rules: the same controls you'd set on a single machine, but applied to all your machines at once.
- Global taint lets you turn the untrusted-data sources on or off account-wide. The page shows the sources the product you are looking at can act on.
- Global rules are the display rules (Show / Hide), the machine-side drop rules ("Don't send"), and, when Report and Raise is enabled on your account, Report and Raise rules that block a risky action at runtime.
These settings belong to your whole account, not to one product: changing a source or rule on one product's page also changes it for your other products.
These are exactly the controls described in Machine configuration; the only difference is scope. A setting on an individual machine overrides the global one; leave a machine's control as unset to inherit whatever you've chosen globally here. For the full explanation of taint sources, rule modes, and when Report and Raise applies, read Machine configuration.
The default rules
The first time you open this page, your global rule list starts with two
default rules instead of an empty table: two enabled "Don't send" drop
rules on source any, one with the event pattern re and one with write.
Together they tell every machine to drop, at the machine, the events whose name
matches re or write, and to send everything else: a conservative starting
point that keeps early noise down.
They are ordinary rules, and they are yours to change: edit their patterns, switch them off, or delete them to have machines send everything. Deleting them sticks; the defaults are seeded only once per account, so they never come back on their own. If you ever enable a drop rule with an empty pattern, the rules editor shows a warning banner, because that rule drops every event.
Dashboard overview
The dashboard is your landing page, the first thing you see after signing in. It gives you a read-only, at-a-glance summary of everything EyalSec has detected, so you can spot trends without digging through the full Events list.
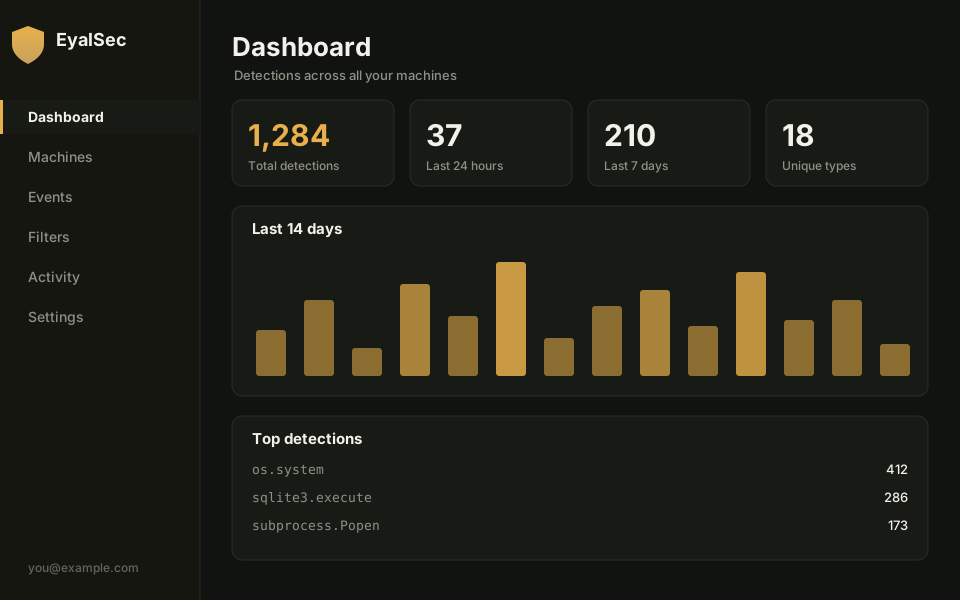
What the cards show
The overview is built from a set of summary cards, a timeline and a few panels:
- Total Detections: the total number of events recorded across all your machines.
- Unique Event Types: how many distinct event names you've seen.
- Last 24 h and Last 7 d: how many events fired in each of those recent windows, so you can tell whether activity is rising or quiet right now (the stats panel adds Last 1 h).
- Detections: last 14 days: a chart of detections per day over the last two weeks, which makes spikes and quiet stretches easy to see.
- Top Events by Count: the events with the highest counts, ranked so the noisiest detections rise to the top.
- Recent Activity: the most recent detections, newest first.
- Event Type Breakdown: each event type's share of the total.
- A stats panel with First detection and Latest detection (the dates of your very first recorded event and your most recent one), Avg detections / day, and the all-time total.
Until you have added a machine, the dashboard also shows an Add your first machine prompt with a link to the Machines page.
Read-only by design
The dashboard doesn't let you change anything; it's a window, not a control panel. When you spot something worth investigating, follow it up elsewhere:
- Click into the Events page to read the full, filterable list and open individual detections.
- Use Filters to hide known-safe noise or block dangerous patterns account-wide.
- Adjust what each machine watches for, and turn on Raise, in Machine configuration.
If your dashboard is empty, your machines may not have detected anything yet. Check that EyalSec is installed and running on the Machines page, and that at least one taint source is switched on (every source is off until you turn it on; see Machine configuration).
Activity log
The activity log is your own audit trail. Every meaningful action on your account is recorded here: who did what, when, from where, and whether it worked. It's a read-only record that lets you review your history and spot anything you don't recognize.
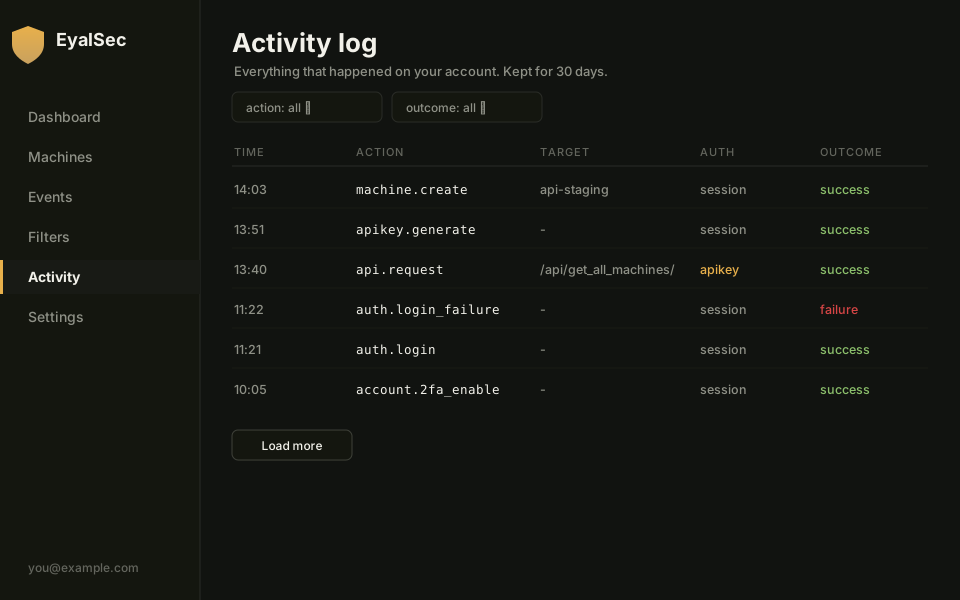
You'll find it on the Activity page (/scanner/activity) in the dashboard.
What each row records
Every entry is one action you (or something using your credentials) took. The table has these columns:
- Time: when the action happened.
- Action: what was done, as a short dotted name like
machine.create,auth.login, orapikey.generate(see the action groups below). - Target: what the action acted on, when it makes sense, for example the machine name, or the affected setting.
- IP: the network address the request came from. If you see a request from an IP you don't recognize, that's worth investigating.
- Auth: how the request was authenticated: session (you, signed in through the website) or apikey (a request made with your API key). This makes it easy to tell apart things you did in the browser from things your scripts or integrations did.
- Outcome: whether the action succeeded or failed. A run of failure rows
(say, repeated
auth.loginfailures) can be an early warning sign.
Filtering the log
The log is shown reverse-chronologically, newest first, and you can narrow it down with two filters:
- Action: filter to a single action, picked from the list (for example
Machine created, Login, Failed login or API key generated).
Action names share a prefix by area, which makes the log easy to scan:
machine.*: anything you did to a machine (add, rename, set its OS, change its rules or taint, reinstall, delete, and so on).account.*: account changes such as your email, password or 2FA.apikey.*: generating, regenerating or revoking your API key.auth.*: sign-in activity, including logins, failed logins and logouts.api.request: calls made against the API, typically with your API key.
- Outcome: show only success or only failure entries.
Loading more history
The log shows 50 entries per page. When there are older entries, a Load more button appears at the bottom; click it to pull in the next batch. It keeps your current filters as you go, so you can page back through just the actions you care about.
How long entries are kept
The activity log keeps the last 30 days of history. Older entries are removed automatically, so this is a recent-activity view, not a permanent archive. If you need a longer record for compliance or an investigation, export or note down what you need before it ages out.
Where this fits
The activity log tracks what you did to your account and machines. To see what
EyalSec detected in your code, head to the Events page or the
Dashboard overview. If something in the log looks wrong
(a login or an API request you didn't make), change your password right away on
the Settings page, and consider turning on two-factor
authentication and revoking your API key there. For anything you can't explain,
contact support@eyalsec.com.
Running es-python
es-python is EyalSec secure Python: the EyalSec runtime that watches
your program as it runs and reports (or blocks) risky behavior. After you install
EyalSec on a machine, this is the program you run your code with instead of your
regular python.
Running your code
Once the installer has finished, just swap python for es-python:
es-python script.py
It behaves like the Python you already know (same language, same standard library), but it's watching for the moment your code uses untrusted data (data that came from the outside world, also called taint) in a risky way. When that happens, EyalSec records an event, which you'll see on the Events page.
If es-python isn't found, make sure you've opened a new shell since installing,
or that ~/.local/bin is on your PATH. See Machines for the
install steps.
Report vs Raise at runtime
EyalSec has two ways to respond when it catches something:
- Report (the default): it records the event and lets your program keep running. Nothing is interrupted; you just get a detection in the dashboard.
- Report and Raise: it stops the risky action by raising a
RuntimeError, aborting that operation. This turns EyalSec from an observer into a guardrail.
Most of the time you'll run in Report mode. You normally turn on Raise from the
dashboard with a mode-3 rule, which is the recommended way and doesn't require
touching the command line; see Machine configuration
and Report mode vs Report and Raise mode. At the command line,
the legacy --raise (and --raise-on-found) flags switch the whole run into
Report and Raise mode, but only while the machine has no Raise rules of its own;
once it does, the rules decide. Adding Raise rules must be enabled on your
account; see Plans & roles.
The taint sources
A source is a place untrusted data can enter your program. By default EyalSec is conservative about what it treats as untrusted, so each source is off by default; you switch the ones you want on. There are three ways to enable a source, in increasing order of how you'll use them day to day:
- A CLI flag:
--make-<source>-vuln, handy for a quick local run. - An environment variable: the mirror
ES2_MAKE_<SOURCE>_VULN=1, the same switch for when you can't change the command line. - The dashboard: the per-source toggle on the Filters page (global) or the Machine configuration Configure modal (per machine). This is how you'll normally do it.
| Source | What it watches | CLI flag | Env mirror | Default |
|---|---|---|---|---|
socket |
data received over the network (incl. TLS) | --make-socket-vuln |
ES2_MAKE_SOCKET_VULN=1 |
off |
file |
data read from files on disk | --make-file-vuln |
ES2_MAKE_FILE_VULN=1 |
off |
stdin |
data on standard input | --make-stdin-vuln |
ES2_MAKE_STDIN_VULN=1 |
off |
foreign |
code loaded from another user's files | --make-foreign-vuln |
ES2_MAKE_FOREIGN_VULN=1 |
off |
env |
environment variables and sys.argv |
--make-env-vuln |
ES2_MAKE_ENV_VULN=1 |
off |
One shortcut applies to the whole set:
--make-everything-vuln(orES2_MAKE_EVERYTHING_VULN=1) turns onsocket,file,stdin, andenvat once, together with the weak-random, hardcoded-credential and database-row checks. It does not includeforeign; enable that one explicitly.
Every source is off by default, so plain es-python app.py with no flags,
env vars, or dashboard rules enabled runs with no taint tracking at all, just
like your regular Python.
For example, to treat everything coming off a socket as untrusted for one run, and combine that with Raise to block it:
ES2_MAKE_SOCKET_VULN=1 es-python app.py
es-python --make-everything-vuln --raise app.py
When a source catches untrusted data reaching a risky operation, the recorded
event carries an origin label naming where the data came from (for example
socket:fd or stdin:input). The sections below list each source's origins so
you can recognise them on the Events page.
Socket-only machines: some older machines run a socket-only es-python that can watch only the
socketsource. On such a machine thefile,stdin,foreign, andenvtoggles do nothing. Socket-only is no longer selectable when adding a machine. See Machines.
The socket source
What it is. Data arriving from the network: anything your program receives from another computer over TCP, UDP, or a local socket, including the plaintext read out of a TLS connection.
What's instrumented. The socket object is marked when it is created or
connected, and the data returned by socket.recv(), recvfrom(), recv_into(),
and recvmsg() (and the ssl.SSLSocket read methods) comes out tainted.
Enable it. --make-socket-vuln / ES2_MAKE_SOCKET_VULN=1, or the socket
toggle on the dashboard. Off by default.
Event origins. socket:fd, socket:connected, socket:unbound; TLS reads
carry ssl:fd; a memory-mapped socket fd carries mmap-socket:fd.
import socket
s = socket.create_connection(("example.com", 80))
s.sendall(b"GET / HTTP/1.0\r\n\r\n")
data = s.recv(4096)        # tainted, origin socket:connected
Limitations. When socket is the only source enabled, and on an older
socket-only machine, data read with a raw os.read(fd, n) on a socket fd is
not tainted: socket taint then follows the socket API (recv*) only.
Enabling any other source as well restores it, except on a socket-only machine.
The file source
What it is. Data read from a file on disk: the contents of any file your program opens and reads.
What's instrumented. The bytes returned by open(path).read(), os.read(),
os.pread(), and mmap of a file descriptor. Each read checks what kind of
file descriptor it came from, and reads from regular files are tainted.
Enable it. --make-file-vuln / ES2_MAKE_FILE_VULN=1, or the file
toggle. Off by default.
Event origins. fd:posix_read, fd:posix_pread, fileio.read(candidate),
fileio.readall(candidate); a memory-mapped file fd carries mmap-file:fd.
ES2_MAKE_FILE_VULN=1 es-python -c 'print(open("/etc/hostname").read())'
# the file contents are tainted, origin fileio.readall(candidate)
Limitations. Checking each read adds some cost on file-heavy workloads. Not available on an older socket-only machine.
The stdin source
What it is. Data fed to your program on standard input: text piped in or typed at the keyboard.
What's instrumented. The string returned by the input() builtin and reads
from sys.stdin (file descriptor 0).
Enable it. --make-stdin-vuln / ES2_MAKE_STDIN_VULN=1, or the stdin
toggle. Off by default.
Event origins. stdin:input (the input() builtin) and stdin (stream
reads via sys.stdin).
name = input("name? ")           # tainted, origin stdin:input
blob = sys.stdin.buffer.read()   # tainted, origin stdin
Limitations. Not available on an older socket-only machine.
The foreign source
What it is. Foreign code: Python loaded from a file that another user on the machine can write to. Loading code you don't fully control is a classic way for an attacker to slip in their own logic. This is the one source that is a detection rather than a taint flow: it fires on the act of loading the file, independent of any data flow, even during interpreter startup.
What's instrumented. Importing a .py/.pyc, running the main script, or
compile/exec/eval of file source, whenever the resolved path is writable
by another user.
Enable it. --make-foreign-vuln / ES2_MAKE_FOREIGN_VULN=1, or the
foreign toggle. Off by default. Note --make-everything-vuln does not
include it; turn it on explicitly.
Event. Loading such a file emits foreign-code:<path>, naming the exact
file; you get one event per resolved path per process, so a noisy import loop
won't flood you. Under Raise, EyalSec aborts the load with a RuntimeError.
Exemptions. If some paths are trusted on purpose (say, a shared tools
directory you maintain), exempt them by listing their absolute path prefixes in
the ES2_FOREIGN_CODE_ALLOW environment variable, separated by colons. There
are no automatic exemptions: even the standard library is checked unless you
add it here.
ES2_MAKE_FOREIGN_VULN=1 ES2_FOREIGN_CODE_ALLOW=/opt/team-tools:/srv/shared es-python app.py
# importing /tmp/evil.py (writable by another user) -> event foreign-code:/tmp/evil.py
Limitations. Not available on an older socket-only machine.
The env source
What it is. Data describing how the program was launched: its environment variables and command-line arguments. Both are influenced by whoever started the process.
What's instrumented. The values read from os.environ (and os.getenv)
and the elements of sys.argv. The environment value is tainted, not the key
(a fixed variable name is not attacker data).
Enable it. --make-env-vuln / ES2_MAKE_ENV_VULN=1, or the env toggle.
Off by default.
Event origins. env (environment values) and argv (argument-vector
elements).
import os, sys
token  = os.environ["API_TOKEN"]   # tainted, origin env
target = sys.argv[1]               # tainted, origin argv
Limitations. Only the value is tainted, not the variable name. Not available on an older socket-only machine.
Installing packages
es-python shares your machine's regular Python packages. There is no separate package manager to learn and no second copy of every dependency.
Anything already installed for your regular python3 is importable in
es-python, with nothing to do:
pip install requests          # your normal python3 pip
es-python -c "import requests"
es-python reads your regular pythonX.Y site-packages directly. Both
interpreters have to be the same X.Y for this to apply.
Installing from es-python works too. es-python -m pip defaults to a --user
install, so packages land in the version-shared ~/.local that your regular
python reads as well:
es-python -m pip install requests
So it does not matter which of the two you install with. Both see the result,
and your regular pip and python are untouched.
The bundled database drivers keep priority. The runtime ships its own copies
of the common database drivers (psycopg2, psycopg 3, mysqlclient, mariadb,
oracledb), each watched for SQL injection at the query string. On Python 3.9,
mysqlclient and psycopg 3 are not included. The bundled drivers sit ahead of
your user packages on the import path, so a later pip install psycopg2 cannot
silently replace the watched one. You keep the sink without pinning anything,
and they behave identically to the regular drivers otherwise.
One consequence worth knowing: pip show psycopg2 can report the plain copy in
~/.local while import psycopg2 loads the bundled one. The import is what
carries the sink.
Turning the sharing off. Set ES2_NO_SYSTEM_SITE=1 to run es-python fully
isolated from the machine's packages:
ES2_NO_SYSTEM_SITE=1 es-python app.py
Use this if a foreign C extension misbehaves under es-python. Inside a virtualenv the sharing is already off, because a venv is self-contained by design.
How the machine picks up your settings
You don't have to restart everything every time you change a setting in the
dashboard. When es-python starts, it fetches that machine's configuration from
EyalSec, then refreshes it in the background roughly every 30 seconds, so new
settings reach the running program on their own.
Two kinds of change behave a little differently:
- Rules (raise and drop rules from Machine configuration) apply on the next event; no restart needed.
- Taint changes (turning sources on or off) take effect on the next process restart, because they change how the interpreter is set up at startup. After changing a taint source, restart your program for it to take hold.
A note on fuzz mode
es-python also carries some --fuzz-* flags. These are experimental and are
not needed for normal use; you can safely ignore them.
Where this fits
The runtime is the part of EyalSec that lives on your host and produces the
events you read in the dashboard. To control its behavior from the web instead of
the command line, see Machine configuration; to
understand the two response modes, see
Report mode vs Report and Raise mode; and to read what it
detects, see Events. If something isn't behaving as expected, reach out
to support@eyalsec.com.
On-machine docs and AI assistants
Every install drops a small docs home at ~/.eyalsec/:
~/.eyalsec/manual/- a runtime guide (also reachable viaeyalsec manual).~/.eyalsec/AGENTS.md- a context file for AI coding assistants (Claude Code, Cursor, Codex, and similar). Runeyalsec agents-initinside a project to load it, so the assistant knows whates-pythonis and uses it correctly.~/.eyalsec/builds/*.json- one record per installed build; seeeyalsec info.
es-python -h also prints these paths at the end of its help.
Uninstalling removes ~/.eyalsec/. Any AGENTS.md symlink or @-include you
added to a project with eyalsec agents-init stays in that project and becomes a
dangling reference; remove it by hand if you no longer want it.
Plans & roles
Your EyalSec account has a set of limits and capabilities that we set for you.
Most things (installing machines, viewing Events, running
es-python, Report mode) work on
every account. A few limits and capabilities vary per account; the table below
shows the defaults.
What your account includes
| Your account | |
|---|---|
| Products | es-python (others, such as es-chromium, only if enabled) |
| Machines | Limited (5 by default), counted per product |
| Events visible | Monthly quota, per view (5,000/month each by default) |
| Report and Raise | Only if enabled |
A few things to note:
- A new self-signup account has no plan yet. Registering and verifying your email gets you a working sign-in, not an allowance: until a plan is set up for the account it has no machines and no visible events, and every page carries a banner saying so. Email sales@eyalsec.com to book a live demo and have your plan sized; the limits then apply immediately. An account created from an invite link arrives already provisioned with the settings we chose for you.
- Products are enabled per account. es-python is on by default. es-chromium and the other agents are off until we enable them for your account. Your Events page shows one list per product you have, so a list you cannot see is a product that is not enabled. See Events.
- Report and Raise, blocking a risky action at runtime instead of just recording it, needs to be enabled on your account. See Report mode vs Report and Raise mode.
What you'll experience as a regular user
Your account mostly stays out of your way. You'll only notice its limits at a few specific moments, each of which gives you a clear message.
The machine cap (409)
Every regular user has a machine limit (5 by default). Try to add one past your cap and EyalSec stops you with an error:
Machine limit reached (5). Contact sales@eyalsec.com to upgrade your plan.
The number in parentheses is your current limit. The limit applies to each product separately, so a limit of 5 means up to 5 es-python machines and up to 5 es-chromium machines, not 5 in total: running out of es-python slots never stops you adding a browser. To get more machines, ask us to raise your machine limit (see below). Deleting a machine you no longer need also frees a slot; see Machines.
An account with no plan yet has a limit of zero, and gets a different message naming that instead of a number:
Your account has no active plan yet, so it cannot add machines.
Book a live demo or email sales@eyalsec.com to get set up.
The event quota
Every regular user also has a monthly event quota (5,000/month by default) capping how many event rows are visible in Events. It resets every calendar month: the first N events that arrive each month are shown, and anything past that is hidden. Nothing is deleted; each new month starts a fresh quota, and an event that fires again in a later month counts against (and can appear in) that month's quota.
The quota applies to each view separately, at its full value. Events has one list per product enabled on your account. Each list gets its own 5,000/month window, so a busy es-python fleet can never eat the allowance for your browser events, and enabling another product adds a whole fresh window rather than dividing the one you have. In total a default account can see up to 5,000 events a month in each list.
When you scroll to the end of your events list, the footer reminds you of the quota for the list you are looking at. To see more events per month, ask us to raise it (see below); a raise lifts the cap on every list at once.
The Raise gate
Report and Raise mode (a "mode-3" rule that tells the runtime to block an action) needs to be enabled on your account. If you try to add a Raise rule before it's enabled, the request is rejected with:
Raise rules are not enabled for your account. Ask an administrator to enable them.
Email sales@eyalsec.com to turn it on. Reporting works for every account
either way; only blocking (Raise) needs the capability enabled. See
Machine configuration for how Raise rules work.
How to get more
There's no self-service upgrade button. To raise your machine limit or event quota, to enable a product such as es-chromium, or to enable Report and Raise, email sales@eyalsec.com and tell us what you need; we set it for you.
Once your grants change, the new limits apply immediately in the dashboard: a higher machine cap unlocks, a newly enabled product's list appears, and Raise becomes available the moment it's granted. You don't need to reinstall anything on your machines. The one place a change is not instant is the agents themselves: if a product is turned off, its agents can keep reporting for up to a minute before the server starts refusing them.
If you're not sure what you need, or you have a question about your account, reach out to support@eyalsec.com. See also Getting help.
API reference
Everything you can do in the dashboard, you can also do over HTTP. The EyalSec JSON API lets you read your data (events, stats, machines, activity) and automate every action the web UI performs: adding machines, generating install commands, creating filters and rules, configuring taint, and more. It's the same backend the dashboard itself talks to.
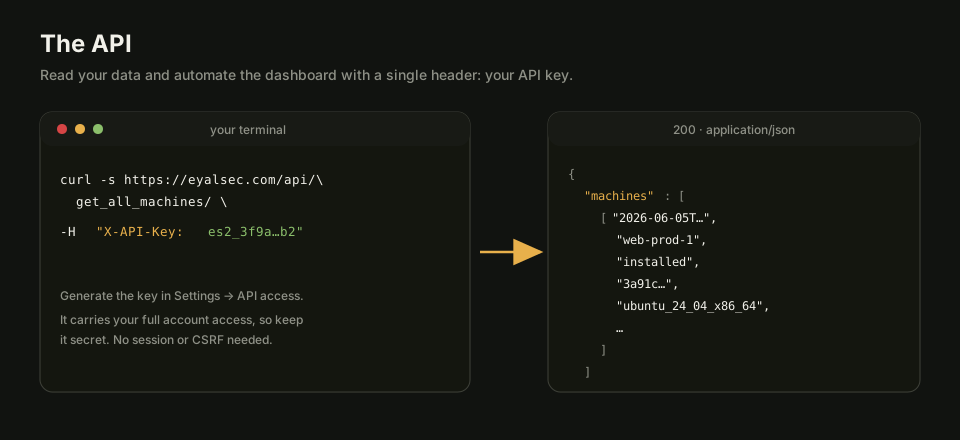
Base URL. All endpoints live under your EyalSec origin; for the hosted
service that's https://eyalsec.com. If you run on your own domain, use that
origin instead. Every path below is relative to it (e.g. the full URL for
GET /api/get_all_machines/ is https://eyalsec.com/api/get_all_machines/).
Authentication
Every /api/* endpoint except the public GET /api/supported_os_types/
and GET /api/supported_python_versions/ needs you to prove who you are. There
are two ways:
-
API key (recommended for scripts). Send an HTTP header:
X-API-Key: es2_3f9a…Generate the key once in Settings: your account under the API access card. The token is shown only once at creation, so copy it then. The format is
es2_followed by a base64url encoding of 32 random bytes (es2_+ base64url(32 bytes)). API-key requests bypass CSRF entirely; there's no token to manage. -
Session + CSRF (what the browser uses). If you're already logged in with a session cookie, you can call the API the way the dashboard does: include the CSRF token either as an
X-CSRFTokenheader or as acsrf_tokenform field on every write. This is convenient from inside a logged-in browser session but awkward from a standalone script, which is why API keys exist.
A few rules that apply to API-key requests specifically:
- They always return JSON: you'll get a body like
{"error": "…"}and never an HTML page or a redirect to the login screen. - A bad, revoked, or expired key returns 401 Unauthorized.
- Read-only keys are judged per endpoint, not by HTTP method. If you tick
read only when generating a key, it can call anything marked read only in
the reference and nothing marked writes. Note that the events query is a
POST(its filters travel in the body) and is still a read, so a read-only key can use it. Under/api/account/, theGETcalls are reads and everyPOSTis a write, so a read-only key is refused all of thePOSTs. - Writes are blocked on a read-only account. If your account has been placed in a read-only state, anything that changes data returns 403 while reads keep working.
A worked example
Fetch your event statistics with nothing but the API key:
curl -s https://eyalsec.com/api/get_event_stats/ \
  -H "X-API-Key: es2_3f9a…"
A typical response:
{
  "total_hits": 1842,
  "unique_types": 27,
  "last_1h": 12,
  "last_24h": 305,
  "last_7d": 1402,
  "top_events": [],
  "recent": [],
  "timeline_14d": [],
  "first_detection": "2026-05-20T09:14:02Z",
  "latest_detection": "2026-06-05T11:48:31Z"
}
Add the same -H "X-API-Key: …" header to any request below.
Events & stats
Read your detected events, the aggregate statistics, and the list of known event names.
Get events (with counts)
POST /api/get_all_events_with_count/
The request body is JSON; every field is optional:
cursor: a base64url-encoded{t, id}pointer for paging (see below).whitelist_repr: regex, case-insensitive; keep only events whosewhere(the event name, index 1 below) matches. Despite the name, it is not matched against the value's text.blacklist_repr: regex, case-insensitive; drop events whosewherematches.from,to: date strings,YYYY-MM-DDor full RFC3339.tois inclusive of the whole day.machine: limit to one machine, by its display name.severity: a list of severities to keep, fromcritical,high,medium,low,info.sources: a list of taint sources to keep, fromsocket,file,stdin,env,argv,manual,fuzzer,foreign.view: limit to one agent kind, frompython(es-python),browser(es-chromium),go,c,cpp,rust,node,solidity,java,bash,rubyandphp(es-go, es-c and so on). This is what the dashboard's events lists send. Omit it (or send an empty string) to get every view your account has, which is what callers written before views existed do. Naming a view your account does not have is a403, and if no products at all are enabled on your account even the omitted form is a403. Any unrecognised value is a400naming the valid ones.bucket: which sanitizer visibility bucket to return, fromlive(the default: only events the sanitizer did not suppress),suppressed(only the suppressed ones) andall. This is what the dashboard's Show control sends. During development this field was briefly calledview; if you have a caller sendingview: "suppressed", rename it tobucket(the old spelling is now a400, not a silent empty page).xss_only:truekeeps only the es-chromium events whose sink can run script: markup sinks, code sinks, script URLs and script bodies, attribute writes, and navigations. Storage and cookie writes are dropped, because the write itself executes nothing; where such a value is read back and used, that read-back is reported as its own event and is kept if its own sink can run script. Style writes, outbound requests, messages and plain-text writes are dropped as well, as are the findings that report a fact about a page rather than a value reaching a sink. This is what the Can cause XSS button on the es-chromium events page sends. It names es-chromium sinks, so it is only meaningful with"view": "browser"; sending it with any other view (or with no view, which means every view) is a400rather than an empty list with no visible cause.tags: a list of impact classes (the labels shown on an event row, such asxssorsqli); keep events carrying any of them. An unknown class is a400.labels: a list of your triage label ids; keep events carrying any of them.scope,advanced: the events page's scope bar and condition builder, in the shape the page sends. An invalid one is a400naming the problem.
The response is a list of events plus a paging cursor:
{
  "events": [
    [
      "2026-06-05T11:48:31Z", "socket.recv -> eval", "<str 'id'>",
      14, "web-prod-01", "critical", "python", 90210,
      "", "", false, "This value was not sanitized.",
      [], [], false, ""
    ]
  ],
  "next_cursor": "eyJ0IjoiMjAyNi0wNi0wNVQxMTo0ODozMVoiLCJpZCI6OTl9",
  "scanned": 100,
  "exhausted": false,
  "oldest_examined": "2026-06-05T11:48:31Z",
  "event_limit": 5000,
  "event_limit_monthly": true
}
This response used to carry a counts object with your account-wide live and
suppressed totals. It does not any more: those two numbers depend on none of this
call's parameters, and counting a whole account inside a page fetch was most of
the request on a large one. They now have their own cached call,
/api/event_visibility_counts/.
Each event is a 16-element array. The positions are fixed, and new fields are only ever appended, so an older client that reads indices 0-11 keeps working:
| Index | Field | Meaning |
|---|---|---|
| 0 | created_at |
When the event was first seen |
| 1 | where |
Display label for what happened |
| 2 | str_repr |
Text representation of the data |
| 3 | count |
How many identical occurrences |
| 4 | machine_name |
Which machine reported it |
| 5 | severity |
Computed severity (critical/high/medium/low/info) |
| 6 | agent_kind |
Which agent reported it (one of the view values above) |
| 7 | id |
Event id, for GET /api/event/{id} |
| 8 | source_label |
Short name for where the data came in (empty for es-python and for agents that do not report one) |
| 9 | context |
The page the flow happened on (es-chromium), or the file written to (an es-python write event); empty otherwise |
| 10 | suppressed |
Boolean: the sanitizer decided this value cannot reach its sink dangerously |
| 11 | sanitize_reason |
One sentence explaining that decision |
| 12 | impact |
List of {label, sev} impact classes for the flow (for example xss) |
| 13 | labels |
Your triage labels on this event, as {id, name, color} |
| 14 | has_comment |
Boolean: you have written a note on this event |
| 15 | extension |
Which browser extension produced this event, by name (es-chromium only; empty for a page script and for every other agent) |
The large per-event fields (trace, origin, repr_created and detail) are
not in this array. A stack trace alone averages about 6 KB, so shipping them
on every row made one 100-event page roughly 1 MB even though the dashboard
renders them only for the row you expand. Fetch them one event at a time with
GET /api/event/{id}, described below.
Paging. The API returns up to 100 events per page, newest first. To fetch
the next page, send the next_cursor value from the previous response as
cursor in your next request. When next_cursor is empty there are no more
pages.
A short page is not the last page. Every request examines a bounded slice of
your history so that no single call can run for seconds, and a selective filter
can match few rows or none inside that slice. So a response may carry fewer than
100 events, or zero, and still hand you a next_cursor. The only signal that a
result set is complete is an empty next_cursor: keep following the cursor until
you get one, even after an empty page. Three fields report the progress:
scanned, how many rows this request examined, exhausted, true when the
scan reached the end of the range, and oldest_examined, the timestamp of the
oldest row it looked at. The dashboard uses them to show
"Searching, reached 3 Mar" while it works back through a long history.
This applies to every filter, including whitelist_repr, blacklist_repr,
machine and sources. A client that stops at the first empty page will report
"no matches" for a search that had matches further back.
Your event quota. The API sees exactly what the dashboard sees, so your
event quota applies (event_limit in the response; -1 means unlimited, and
event_limit_monthly tells you whether it resets each calendar month). Limits
are set per user, not by a plan tier.
The quota applies per view, at its full value. Each agent kind gets its own
window, so an event_limit of 5000 means up to 5000 visible python events AND
up to 5000 browser AND up to 5000 of every other view your account has, not
5000 across the account. Each window keeps that kind's earliest-arriving events
for the period and hides the rest until it resets. This is why a busy es-python
fleet can no longer hide your es-chromium events: one kind's volume cannot
consume another kind's allowance, and enabling another product adds a whole
fresh window rather than dividing the one you have.
This endpoint is a read, so it still works on a read-only account. Errors: 400
(bad JSON, bad cursor, invalid regex, unparseable timestamp, or an unknown view,
bucket or tag), 403 (a view your account does not have), 500 (server error).
curl -s https://eyalsec.com/api/get_all_events_with_count/ \
  -H "X-API-Key: es2_3f9a…" \
  -H "Content-Type: application/json" \
  -d '{"from":"2026-06-01","severity":["critical","high"],"blacklist_repr":"^healthcheck$"}'
Get one event's detail
GET /api/event/{id}
Returns the large fields the events list deliberately leaves out, for the single
event whose id you pass (index 7 of an events-list row):
{
  "trace": "Traceback (most recent call last)…",
  "source": "",
  "origin": "{...origin...}",
  "repr_created": "<str 'id'>",
  "detail": "/var/www/app/handler.py",
  "comment": "",
  "extension": {"id": "", "name": "", "version": "", "label": ""}
}
source is a reserved field and is always blank on your account. comment is
your own note on the event (see
Write your note on an event), empty when you have
not written one. Everything else is returned in full.
extension names the browser extension an es-chromium event came from. All four
fields are empty when no extension was involved, which is the case for every
es-python event and for anything an ordinary page script did. id is
the 32-character Chrome extension id, which is the only part the browser itself
reports; name and version come from that extension's own manifest, which
es-chromium sends once per browser session. label is what you should display:
the name and version when they are known, and the id when they are not.
The event must belong to you. Ownership is part of the lookup, so an id that is
not yours is indistinguishable from one that does not exist: both return 404.
Errors: 400 (id is not a number), 404 (no such event on your account), 500
(server error).
curl -s https://eyalsec.com/api/event/90210 -H "X-API-Key: es2_3f9a…"
Get event statistics
GET /api/get_event_stats/
Returns the dashboard summary:
{
  "total_hits": 1842, "unique_types": 27,
  "last_1h": 12, "last_24h": 305, "last_7d": 1402,
  "top_events": [], "recent": [], "timeline_14d": [],
  "first_detection": "2026-05-20T09:14:02Z",
  "latest_detection": "2026-06-05T11:48:31Z"
}
first_detection and latest_detection may be absent if you have no events yet.
Get your event count
GET /api/event_count/?view=python
How many stored events count toward your current quota period, plus your limit:
{ "count": 1234, "view": "python", "event_limit": 5000, "event_limit_monthly": true }
The period is the current calendar month when event_limit_monthly is true, and
all time otherwise. event_limit is -1 when you have no limit.
view is optional and takes the same values as the events list's view.
Because the quota applies per view, so does this tally: with
a view the count is that kind's alone and lines up with the event_limit the
same list is capped by. Omit it for the total across every view you have; if
that is exactly one view, the unscoped tally is that view's, and if it is more
than one it is a number no single list is capped by. A view your account does
not have is a 403, and an unrecognised view is a 400, not a silent
whole-account count. The response echoes back the view it counted, so a caller
firing one request per list can tell the answers apart.
Counting every row you own is expensive on a large account, so the value is cached per user and view and refreshed in the background: repeat calls answer instantly and may be a few minutes behind.
Get your event count per view
GET /api/event_view_counts/
How many of your stored events came from each agent kind. The events page uses it for the count beside each list in the sidebar:
{ "python": 1204, "browser": 38 }
The keys are the views your account has, and every one of them is always present, at zero when you have none, so a missing key never has to be read as either zero or an error. Which views those are is set per account: every product is one an administrator enables for you individually. An account with no products enabled gets an empty object.
Each number is what the events list for that view would actually show you, not a
raw row count. Two things narrow it, both the same ones that narrow the list, so
that the tab and the rows under it can never disagree: your monthly event quota
(admins have none) and the bucket parameter, which is the events page's "Show"
control. bucket=live is the default and counts only unsuppressed events;
bucket=suppressed counts only suppressed ones; bucket=all counts both.
/api/event_count/ is still the separate quota-period tally.
Optional query parameters: bucket, plus scope, scope_mode and
scope_empty, which restrict the tally the same way the events page's scope bar
restricts the list.
Counting every row you own is expensive on a large account, so the value is cached per account, scope, bucket and quota, and refreshed in the background: repeat calls answer instantly and may be up to a minute behind.
Get your live / suppressed split
GET /api/event_visibility_counts/
How many of your stored events the sanitization policy currently shows, and how many it hides. The events page uses it for the count beside its "Show" control:
{ "live": 1200, "suppressed": 34 }
Suppression never deletes anything, so these two numbers always add up to every
event you have stored. Nothing narrows them: no quota, no view, no scope, no
filter, no bucket. That is why this is its own call rather than a field of
/api/get_all_events_with_count/, whose answer depends on all of those.
Counting every row you own is expensive on a large account, so the value is cached per account and refreshed in the background: repeat calls answer instantly and may be up to a minute behind.
Export events
POST /api/events_export?format=csv|json
Downloads every event matching a filter, instead of one page of them. The body
is exactly the body of /api/get_all_events_with_count/, and the two share the
same request handling, so your monthly quota, the bucket you asked for, the
tag predicate and every filter mean the same thing here as they do on the events
page. The file covers the rows the page was showing you, not a different set.
format is csv (the default) or json; anything else is a 400 naming the two.
A cursor in the body is ignored, since an export is the whole set rather than
the page you had scrolled to.
Every row carries the heavy fields the events list leaves out, because a finding
you cannot reproduce is not worth exporting: the page URL and call site, the
origin, repr_created and the stack trace. taint_chain is the recorded chain
of steps the value took, and it is blank unless you are an administrator,
exactly as it is on GET /api/event/{id}. The column is there either way, so a
non-admin file and an admin file line up column for column.
curl -s -X POST 'https://eyalsec.com/api/events_export?format=csv' \
  -H "X-API-Key: es2_3f9a…" \
  -H "Content-Type: application/json" \
  -d '{"view":"browser","severity":["critical","high"]}' \
  -o findings.csv
An export stops at 50,000 rows. It always says so rather than ending
quietly: CSV appends a final row beginning TRUNCATED, and JSON sets
"truncated": true. Narrow the date range or the filter to get the rest.
Get event names
GET /api/event_names/
{ "names": ["socket.recv -> eval", "open -> exec", "…"] }
Saved searches
A saved search is a named events-page query string: the view, the scope, the toolbar filters and the advanced conditions, exactly as they appear in the page URL. Picking one puts the page back where it was. This is not the same thing as a filter: a filter is a standing rule applied to every events query, while a saved search does nothing until you choose it.
Searches are stored per view, because the searchable fields differ per agent, so every call names one view.
GET /api/event_searches/?view=python
view takes the same values as the events list's view and defaults to
python. An unrecognised value is a 400, and a view your account does not have
is a 403.
{ "searches": [ { "id": 3, "name": "my domain", "view": "browser",
                  "query": "view=browser&scope=shop.test" } ] }
POST /api/event_searches/
JSON body: name (1 to 80 characters, trimmed), view, and query (the query
string without the leading ?, at most 4096 characters). Saving the same name
again in the same view overwrites it, which is how you edit a search. Returns
201 and the view's whole list, so the new id is there without a second
call.
curl -s https://eyalsec.com/api/event_searches/ \
  -H "X-API-Key: es2_3f9a…" \
  -H "Content-Type: application/json" \
  -d '{"name":"my domain","view":"browser","query":"view=browser&scope=shop.test"}'
DELETE /api/event_searches/{id}
Returns 204. An id that belongs to another account deletes nothing and still returns 204, so the reply never confirms that someone else's row exists.
Machines
List your machines and perform every action on the Machines page.
List machines
GET /api/get_all_machines/
{
  "machines": [
    [
      "2026-05-20T09:00:00Z", "web-prod-01", "installed",
      "m_8f3c2a1b", "ubuntu_24_04_x86_64",
      "bc0ef13-20260604T120000Z", "bc0ef13-20260605T080000Z",
      "3.13", false, false, false, false, "python"
    ]
  ]
}
Each machine is a 13-element array:
| Index | Field | Meaning |
|---|---|---|
| 0 | created_at |
When you added the machine |
| 1 | machine_name |
The name you gave it |
| 2 | status |
created, pending, or installed |
| 3 | public_id |
Safe machine handle used in other API calls |
| 4 | os_type |
Distro + arch target |
| 5 | installed_build |
Build version currently installed on the host |
| 6 | current_build |
Latest build available for this machine: for es-python, for its target and Python version |
| 7 | python_version |
The Python version this machine runs (e.g. 3.13) |
| 8 | socket_only |
Dormant. Machines created now are never socket-only, so this reads false; older machines may still carry true. |
| 9 | clone_locked |
true when a clone/tamper identity mismatch was flagged |
| 10 | stalled |
true when an install has sat in pending too long |
| 11 | stale_agent |
true when an old install's runtime (revoked credential) is still phoning in |
| 12 | agent_kind |
Which product this machine runs (one of the events list's view values) |
The machine's secret is never exposed by the API. You reference machines by
their public_id. When installed_build and current_build differ, an update
is available (see Machines).
curl -s https://eyalsec.com/api/get_all_machines/ \
  -H "X-API-Key: es2_3f9a…"
Add a machine
POST /api/add_new_machine/
Form fields:
machine_name(required)product(optional): which product this machine runs,python(the default) orbrowser. You must have that product enabled on your account. Machines for the other products are registered on the Machines page, which also gives you their install command, so naming one here is a 422 that says so.distro,arch(required forproduct=python): combined into the machine'sos_type. Unused forproduct=browser, which has a single published build.python_version(optional,product=pythononly): defaults to3.13; must be one of the versions fromGET /api/supported_python_versions/?os=<distro>_<arch>. A version that is supported but not published for that target is a 422 naming both, rather than a machine that cannot finish installing.
Returns 200:
{ "Name": "web-prod-02", "OsType": "ubuntu_24_04_x86_64",
  "Status": "created", "PublicID": "m_a1b2c3d4",
  "PythonVersion": "3.13", "SocketOnly": "false", "AgentKind": "python" }
An es-chromium machine omits the fields that are es-python's alone:
{ "Name": "test-browser", "OsType": "", "Status": "created",
  "PublicID": "m_a1b2c3d4", "AgentKind": "browser" }
Errors: 422 (bad/missing field, unknown target or Python version, a product that
is not registered here), 409 (machine limit reached; an account with no plan yet
has a limit of 0), 403 (CSRF, or a product
that is not enabled on your account). SocketOnly always comes back "false":
machines created now are never socket-only (the field is retained but dormant).
Your machine limit is counted per product, so a full es-python allowance does not consume your es-chromium one.
Set a machine's OS
POST /api/set_machine_os/
Form fields: machine_name, distro, arch. Returns 200:
{ "machine_name": "web-prod-02", "os_type": "debian_12_aarch64" }
Rename a machine
POST /api/rename_machine/
JSON body {"public_id": "m_…", "machine_name": "new-name"} → 200.
Delete a machine
POST /api/delete_machine/
JSON body {"public_id": "m_…"} → 204. This cascades: the machine and
all of its events are removed (see Machines).
Get the install command
POST /api/get_eyalsec_install_script_data/
JSON body {"public_id": "m_…", "attested": true} returns a one-time install
secret. attested must be true: it is your confirmation that you are
authorized to monitor that machine, the same box the dashboard asks you to tick.
{ "secret": "…", "script_path": "https://eyalsec.com/install.sh", "os_type": "ubuntu_24_04_x86_64" }
The secret is single-use with a 10-minute TTL. This call serves es-python
machines; an es-chromium machine gets its install command from the
Machines page. Errors: 422 (attested missing or false, or no OS set
yet), 404 (unknown machine), 403 (a product that is not enabled on your account).
Reinstall (update) a machine
There is no separate reinstall endpoint. Re-installing is just installing
again: call the same
POST /api/get_eyalsec_install_script_data/ shown above. If the machine is
currently installed, pending or failed, the handler resets it to created for you
(clearing installed_at, the recorded build and the clone identity, and
deleting any outstanding install tokens) and then mints a fresh token. Your
machine's name, public_id, configuration and events are untouched.
curl -s https://eyalsec.com/api/get_eyalsec_install_script_data/ \
  -H "X-API-Key: es2_3f9a…" \
  -H "Content-Type: application/json" \
  -d '{"public_id":"m_8f3c2a1b","attested":true}'
The live credential is not rotated at this point, only when the new install actually starts, so the binary already on the host keeps reporting until it is replaced.
Get the uninstall command
POST /api/get_uninstall_script_data/
JSON body {"public_id": "m_…"} returns a one-time secret and the uninstall
script path, the same command the Machines page shows:
{ "secret": "…", "script_path": "https://eyalsec.com/uninstall.sh" }
The secret is single-use with a short life.
es-python machines only. The command removes that product and nothing else, so asking for another product's machine returns 422; delete the machine instead.
Supported OS types (public)
GET /api/supported_os_types/
Needs no authentication:
{ "distros": [ { "id": "ubuntu_24_04", "label": "Ubuntu 24.04 LTS",
                 "archs": ["x86_64", "aarch64"] } ] }
Supported Python versions (public)
GET /api/supported_python_versions/
Also needs no authentication. Returns the versions you can pick when adding a machine, and the default:
{ "versions": ["3.9", "3.10", "3.11", "3.12", "3.13", "3.14"], "default": "3.13" }
Add ?os=<os_type> to get only the versions available for that target:
GET /api/supported_python_versions/?os=ubuntu_24_04_x86_64
A version can be supported in general and not yet published for a particular
distribution and architecture, so a client that is populating a chooser should
always pass os; otherwise it can offer a combination that
POST /api/add_new_machine/ will refuse. The default in the response is
always one of the versions in the same response. An unknown os is a 422.
Filters
Manage the global whitelist/blacklist filters from the Filters page.
List filters
GET /api/filters/
{ "filters": [ { "id": 7, "pattern": "^healthcheck$", "label": "noise",
                 "mode": "blacklist", "target": "where", "enabled": true,
                 "engine": "any" } ] }
Add ?engine=<view> to list only the filters that apply on one product's
Filters page: those for that product plus those set to any.
Create a filter
POST /api/filters/create/
JSON body:
pattern(required): a regex, at most 512 characters.label: your description, at most 128 characters.mode(required):blacklistorwhitelist.target: what the pattern is matched against.where(the default) is the event name;originis the label of where the data came in;tagtakes an impact class (such asxss) as its pattern instead of a regex.engine:any(the default) or one of the events list'sviewvalues, to apply the filter on one product's events only.enabled: defaults totrue.
Returns 201 with the created filter. An empty or over-long pattern, an
unknown mode, target, engine or impact class returns 400.
curl -s https://eyalsec.com/api/filters/create/ \
  -H "X-API-Key: es2_3f9a…" \
  -H "Content-Type: application/json" \
  -d '{"pattern":"^healthcheck$","mode":"blacklist","label":"noise"}'
Update a filter
PATCH /api/filters/{id}/update/
Send a partial JSON body with just the fields you want to change → 200. A missing filter returns 404.
Delete a filter
DELETE /api/filters/{id}/delete/
Returns 204.
Machine rules
Machine rules drive the dashboard display (modes 1 and 2), machine-side event
dropping (mode 4), and runtime Raise behavior (mode 3). For the full concept, see
Machine configuration. The machine field is a
public_id, or '' (empty string) to target the global scope.
List rules
GET /api/machine_rules/?machine=<public_id|>
{
  "rules": [
    { "ID": 12, "Source": "any", "EventPattern": ".*eval.*",
      "Mode": 3, "Action": "raise", "Polarity": "whitelist",
      "Label": "block eval", "Enabled": true, "sanitize_scope": "any" }
  ]
}
Note the capitalized field names in rule objects (all but
sanitize_scope). Action and Polarity are legacy fields: Action is always
raise, and Polarity follows the mode (blacklist for mode 4, whitelist
otherwise). Mode is what decides what the rule does.
Create a rule
POST /api/machine_rules/create/
JSON body:
machine: apublic_id, or''for global.polarity: accepted for compatibility and checked (whitelistorblacklist), but the stored value always follows the mode.event_pattern: a regex. Empty (or omitted) means all events (.*).mode:1(Hide, UI),2(Show, UI; the default),3(Raise, blocks on the machine), or4(Don't send: the machine drops matching events).source:any(the default) applies the rule to every taint source. To limit it to one, pass a rule-source name (such assocketorweak-random, see the note under Set a taint source) or a number.sanitize_scope:any(the default),unsanitized,sanitized,conditional, orsanitized:<class>, to match events by what the sanitizer decided about them.label,enabled(defaults totrue).
Returns 201 with the created rule (same shape as the list).
Mode 3 (Raise) has to be enabled for your account. It is a per-account
setting rather than something you switch on yourself. Without it the request
returns 403 with a message saying Raise rules are not enabled for your
account, and who to ask. Check grant_raise on
GET /api/account/ to see where you stand before you try.
curl -s https://eyalsec.com/api/machine_rules/create/ \
  -H "X-API-Key: es2_3f9a…" \
  -H "Content-Type: application/json" \
  -d '{"machine":"m_8f3c2a1b","polarity":"whitelist","event_pattern":".*eval.*","mode":3,"label":"block eval"}'
Update a rule
PATCH /api/machine_rules/{id}/update/
Partial JSON (any of polarity, event_pattern, mode, source,
sanitize_scope, label, enabled) → 200 with the updated rule. Changing a
rule's mode to 3 re-checks that Raise is enabled for your account.
Delete a rule
DELETE /api/machine_rules/{id}/delete/
Returns 204.
Rule templates
A rule template is a named, ordered set of rules you can apply to a rule scope (your global rules, or one machine) in a single step. There are two kinds:
- Personal templates, which you create and only you can see.
- EyalSec templates, published by an administrator and visible to every account. You can apply them; you cannot change them.
Applying a template copies its rules into the scope. The copies are ordinary rules from that moment on: edit them, disable them or delete them like any other. Editing the template afterwards does not reach back into a scope that has already applied it, and deleting a template does not remove rules applied from it.
List templates
GET /api/rule_templates/
{
  "templates": [
    {
      "id": 3,
      "owner": "eyalsec",
      "name": "OWASP basics",
      "description": "",
      "items": [
        { "source": "socket", "event_pattern": "exec|eval",
          "mode": 2, "sanitize_scope": "any", "position": 0 }
      ]
    }
  ]
}
owner is me for your own templates and eyalsec for the published ones.
Items carry the same four fields a rule does: source, event_pattern, mode
and sanitize_scope. They deliberately carry no enabled flag (an applied rule
always lands enabled) and no polarity (it follows the mode, as it does on a
rule).
Create a template
POST /api/rule_templates/create/
JSON body: name (required, unique among your own templates, compared without
regard to case), description (optional), and items (the rule list). Each item
is validated exactly the way Create a rule validates a rule, so
a template can never hold something that would be refused as a rule.
At most 50 templates per account and 200 items per template. Returns 201 with the created template.
curl -s https://eyalsec.com/api/rule_templates/create/ \
  -H "X-API-Key: es2_3f9a…" \
  -H "Content-Type: application/json" \
  -d '{"name":"My web app","items":[{"source":"socket","event_pattern":"exec|eval","mode":2}]}'
Update a template
PATCH /api/rule_templates/{id}/update/
Takes the same body as create and replaces the item list with the one you send, so include every item you want to keep. Returns 204. A template you do not own returns 404, which includes every EyalSec template.
Delete a template
DELETE /api/rule_templates/{id}/delete/
Returns 204. A template you do not own returns 404.
Apply a template
POST /api/rule_templates/{id}/apply/
JSON body: machine, a public_id or '' for the global scope. Works on your
own templates and on EyalSec ones.
{ "added": 5, "skipped_raise": 2, "skipped_duplicate": 1 }
Nothing is replaced: the scope's existing rules are left alone and the template's rules are added to them. Two kinds of item are skipped rather than added, and both are counted so a partial apply is never silent:
skipped_duplicate: the scope already has a rule with the samesource,event_pattern,modeandsanitize_scope. Applying the same template twice therefore adds nothing the second time.skipped_raise: the item is a Raise rule (mode 3) and Raise is not enabled for your account. The rest of the template still applies. See Create a rule for how to check that setting.
Save a scope's rules as a template
POST /api/rule_templates/snapshot/
JSON body: name (required), description (optional) and machine (a
public_id, or '' for global). Captures the rules currently in that scope as a
new personal template and returns 201 with it. Disabled rules are captured
too, since a template item has no enabled flag. The same 50-template and
200-item ceilings apply.
Taint
Read and set which taint sources are tracked, per machine or globally. For what the sources mean and when changes take effect, see Machine configuration.
Read taint settings
GET /api/machine_taint/?machine=<public_id|>
Every gate key is always present, for every product, including ones the machine's agent does not read (an agent ignores a key it has no counterpart for). The response below is shortened; the real one carries every key:
{ "taint": { "socket": "on", "file": "off", "stdin": "unset",
             "foreign": "unset", "env": "unset", "make_vuln": "unset",
             "argv": "unset", "weak_random": "unset", "hardcoded": "unset",
             "db_rows": "unset", "…": "unset" } }
Set a taint source
PUT /api/machine_taint/
JSON body:
machine: apublic_id, or''for global.source(required): a gate key, i.e. any key the read above returns. For es-python those aresocket,file,stdin,foreign,env,make_vuln,argv,weak_random,hardcoded,identity,db_rowsandhandoff; each product's Filters page shows the ones that product reads. A key with no counterpart in an agent is ignored by it, never mapped onto a different source. es-chromium reads none of them.state(required):on,off, orunset(inherit).
Two of these keys are spelled differently as a rule source. The value you pass here is a gate key (underscores); the value you put in a rule's
sourcefield is a rule-source name. They differ in exactly two places: gateweak_randombecomes rule sourceweak-random, and gatedb_rowsbecomes rule sourcedb. Passing the gate-key form to a rule fails validation and the rule is rejected.
Returns 204. An unknown key or state is a 400. Remember: taint changes take
effect on the next process restart of es-python.
curl -s -X PUT https://eyalsec.com/api/machine_taint/ \
  -H "X-API-Key: es2_3f9a…" \
  -H "Content-Type: application/json" \
  -d '{"machine":"m_8f3c2a1b","source":"socket","state":"on"}'
Event labels & notes
Triage tools for the events list: your own colored labels ("mark this event"), and one editable note per event.
Event ids are sequential and enumerable, so the routes that write to an event return 404, not 403, for an id that exists but is not yours: that keeps a foreign id indistinguishable from a nonexistent one. Detaching a label and deleting a note return 204 whether or not the event was yours, for the same reason from the other direction. Deleting is scoped by owner in the statement, so a foreign id deletes nothing, and reporting that it matched nothing would itself answer the question the 404 exists to withhold.
List labels
GET /api/event_labels/
{ "labels": [ { "id": 1, "name": "triage", "color": "amber" } ] }
Create a label
POST /api/event_labels/
JSON body:
name(required): 1-48 characters, trimmed. Unique per account, case-insensitively; a duplicate returns 409.color: one ofamber,cyan,red,green,blue,slate,violet,pink. An unrecognized value is not rejected, it defaults toamber.
Returns 201 with the created label.
curl -s -X POST https://eyalsec.com/api/event_labels/ \
  -H "X-API-Key: es2_3f9a…" \
  -H "Content-Type: application/json" \
  -d '{"name":"triage","color":"amber"}'
Rename or recolor a label
PATCH /api/event_labels/{id}/
Send name (required) and optionally color → 204. The label is rewritten
whole, so leaving color out sets it back to amber. A label you do not own
returns 404.
Delete a label
DELETE /api/event_labels/{id}/
Returns 204. This also removes the label from every event it was attached to. A label you do not own returns 404.
Attach a label to an event
POST /api/event/{id}/labels/
JSON body: label_id (required). Returns 204. Re-attaching a label that is
already on the event is a no-op, not an error, since the events page toggles
labels on click.
Detach a label from an event
DELETE /api/event/{id}/labels/{labelID}/
Returns 204. Detaching a label that was not attached is also a no-op.
Write your note on an event
PUT /api/event/{id}/comment/
JSON body: body (required), at most 4096 bytes. There is one note per user per
event; writing again replaces it. Returns 204.
curl -s -X PUT https://eyalsec.com/api/event/12345/comment/ \
  -H "X-API-Key: es2_3f9a…" \
  -H "Content-Type: application/json" \
  -d '{"body":"looks like a false positive"}'
Delete your note on an event
DELETE /api/event/{id}/comment/
Returns 204.
Activity
Read your own audit trail, the same data shown on the Activity log page.
GET /api/activity/?action=&outcome=&before_ts=&before_id=
Results are newest-first and keyset-paged, 50 per page. Filter with:
action: one exact action name, such asapi.request,machine.create,auth.loginorapikey.generate. There are no wildcards.outcome:successorfailure.before_ts,before_id: the keyset pointer for the next page: thetimeandidof the last entry you received.
{ "entries": [ { "time": "2026-07-16T06:20:00Z", "id": 4812,
                 "action": "machine.create", "description": "Created machine web-prod-01",
                 "target": "web-prod-01", "source_ip": "203.0.113.4",
                 "auth_method": "apikey", "outcome": "success" } ] }
Activity is retained for 30 days.
curl -s "https://eyalsec.com/api/activity/?action=machine.create&outcome=success" \
  -H "X-API-Key: es2_3f9a…"
Your account
Everything on the Settings page is here too: your profile, password, two-factor auth, API keys and billing.
These endpoints ask for the same proof the dashboard asks for. Changing your password over the API needs your current password, exactly as the form does. Generating a key needs your password and a 2FA code. An API key on its own is never enough. That is deliberate: the API should not be an easier way into your account than the browser, so a leaked key still cannot take it over.
Send the credentials as form fields alongside the rest of the request:
password, and totp when your account has two-factor auth on. A backup code
works anywhere a totp code does.
Three of these destroy the key you are calling with. Read the warnings.
Read your profile
GET /api/account/
{
  "username": "alice",
  "email": "alice@example.com",
  "timezone": "Asia/Jerusalem",
  "email_verified": true,
  "totp_enabled": true,
  "email_2fa_enabled": false,
  "machine_limit": 5,
  "event_limit": 5000,
  "event_limit_monthly": true,
  "grant_raise": false
}
This is where you check what your account is actually allowed to do:
machine_limit, event_limit (-1 means unlimited) and grant_raise.
event_limit is the cap on each view, not on all of them added together, so
the account total you can see is up to that number times the number of products
on your account. It never returns your
password, your two-factor secret, or any key.
Set your timezone
POST /api/account/timezone
Form field timezone: an IANA name such as Asia/Jerusalem. Send it empty to go
back to automatic (your browser's zone). No password needed, same as the
dashboard. Returns 200 with {"timezone": "Asia/Jerusalem"}; an unknown zone
returns 422 and changes nothing.
Change your recovery email
POST /api/account/email
Needs password, plus totp when 2FA is on. Form field email.
A new address is not applied immediately. A confirmation link is emailed to it, and the change only lands once you click that link, exactly like the dashboard. This is what stops someone with a stolen session pointing your recovery address at themselves.
{
  "status": "confirmation_sent",
  "email": "new@example.com",
  "note": "not applied yet: click the link sent to the new address to confirm"
}
Sending an empty email removes your recovery address straight away. That
also disables email 2FA (there would be nowhere to send the code) and signs out
every session.
Change your password
POST /api/account/password
Needs current_password. Then new_password, and optionally confirm (if you
send it, it has to match).
This revokes your API key. A password change signs out every session and deletes your key, so the key making this call stops working the instant it succeeds. Generate a new one afterwards.
{
  "status": "password_changed",
  "note": "your API key and all sessions were revoked; generate a new key"
}
Delete your account
POST /api/account/delete
Needs password. Returns 204 and removes the account and everything in it.
There is no undo.
Set up an authenticator app
GET /api/account/2fa/setup
{
  "secret": "JBSWY3DPEHPK3PXP",
  "otpauth_url": "otpauth://totp/EyalSec:alice?secret=…",
  "expires_in_seconds": 600,
  "note": "call /api/account/2fa/enable with a code from this secret to activate it"
}
The secret is held for you server-side for 10 minutes. Turn otpauth_url into a
QR code, or type secret into your app by hand. Calling this again starts over
with a fresh secret.
Turn on the authenticator app
POST /api/account/2fa/enable
Needs password, and totp: a code generated from the secret you just got.
Note the difference: that totp proves you hold the authenticator, it is not a
second factor on this request. The password is the re-auth.
Returns your backup codes, shown once:
{
  "status": "2fa_enabled",
  "backup_codes": ["…", "…"],
  "note": "backup codes are shown once; store them now. All sessions were revoked."
}
A wrong code returns 422 and enables nothing. Calling this without doing setup first returns 409.
Turn off the authenticator app
POST /api/account/2fa/disable
Needs password. Signs out every session, so your other devices have to log in
again.
New backup codes
POST /api/account/2fa/backup/regenerate
Needs password. Replaces any codes you already had, so the old ones stop
working. Shown once. Requires the authenticator app to be set up (409 if not).
Email second factor
POST /api/account/2fa/email/enable
POST /api/account/2fa/email/disable
Both need password. Enabling requires a recovery email on file, since that is
where the code is sent (409 without one).
Look at your API key
GET /api/account/apikey
{
  "exists": true,
  "key_prefix": "es2_3f9a…",
  "scope": "full",
  "created_at": "2026-07-01T09:00:00Z",
  "expires_at": "2027-01-01T00:00:00Z",
  "last_used_at": "2026-07-16T06:20:00Z",
  "last_ip": "203.0.113.4"
}
Useful for checking whether a key is still in use, and from where. It never returns the key itself: only a hash is stored.
Generate a key
POST /api/account/apikey/generate
Needs password, plus totp when 2FA is on. Optional expires (a future
YYYY-MM-DD; omit for a key that never expires) and read_only (any non-empty
value).
This replaces your current key. You get one key per account, so generating a new one kills the one you are calling with. Copy
api_keyfrom the response or you will lock yourself out.
{
  "api_key": "es2_NEWKEY…",
  "note": "shown once, and it replaces any previous key for this account"
}
A past expires returns 422 and creates nothing.
Revoke your key
POST /api/account/apikey/revoke
Needs password. Returns 204. If you revoke the key you are calling with,
that call is the last thing it does.
Billing portal link
GET /api/account/billing/portal
Returns the URL behind the dashboard's Manage billing button:
{ "portal_url": "https://customer-portal.paddle.com/…" }
404 when there is no active subscription.
What is not here
- Signing out has no API equivalent. Keys do not have sessions, so there is nothing to sign out of. Revoke the key instead.
- Confirming a recovery-email change happens by clicking the link in your inbox. Proving you own an address is not something a key can shortcut.
- Registering a machine for a product other than es-python and es-chromium, and getting an es-chromium install command, happen on the Machines page.
Rate limits
Every response that hits a limit returns 429 with a Retry-After header. The
per-key and password limits answer with a JSON body; the per-address limits
answer in plain text.
| Limit | Applies to |
|---|---|
| 300 requests/minute per API key | Everything you call with a key. Counted against your account, so making a new key does not reset it. |
| 600 requests/minute per IP address | All traffic from one address, keyed or not. |
| 120 requests/minute per IP address | The events calls together: POST /api/get_all_events_with_count/ (the heaviest read), the export, GET /api/event/{id}, /api/event_view_counts/ and /api/event_visibility_counts/. |
| 10 requests/minute | Anything under /api/account/ that asks for your password. |
The per-key and per-IP limits are counted separately and both apply, so whichever runs out first is the one you feel.
Getting your password wrong repeatedly locks the account. Five wrong attempts in a row and it locks for a minute, doubling up to 15 minutes. This is the same counter the login page uses, so a locked account is locked everywhere. While it is locked you get 429 even with the right password.
Agent endpoints
These endpoints are used automatically by the EyalSec agents on your monitored machines; you normally never call them by hand. They're listed here for completeness. They authenticate with the machine's secret, not your API key.
Report an event
POST /api/create_event/ (alias: POST /events)
The runtime sends a Secret: <machine-uuid> header and the event fields
base64-encoded: where, repr, trace, location, and origin. The
server responds 202 Accepted without waiting for the event to be stored;
it's fire-and-forget. A machine sending faster than its allowance gets 429, and
503 means the server as a whole is shedding load. Events are
aggregated and counted server-side, which is why the dashboard shows counts
rather than one row per occurrence (see Events).
Fetch machine configuration
GET /api/machine_config
The runtime sends the Secret header and receives the machine's encrypted
configuration (its taint settings and rules). The response is conditional:
the agent sends an X-Config-Version header and gets 304 Not Modified when
nothing has changed. es-python polls this at startup and roughly every 30
seconds (see Running es-python).
Install bootstrap (public)
POST /install.sh
POST /install/payload
These serve the self-extracting installer when you run the install command from
the Machines page. They're public and always reachable so a new
machine can bootstrap, and they support HTTP Range requests so an interrupted
download can resume with curl -C -. The public
GET /api/supported_os_types/ (documented under Machines) is also
used here to list the available targets.
Errors
The API uses standard HTTP status codes. API-key requests always return a JSON
body of the form {"error": "…"} rather than an HTML page or a redirect.
| Status | Meaning |
|---|---|
| 400 | Bad request: malformed JSON, an invalid regex, or an unparseable cursor or timestamp. |
| 403 | Forbidden: failed CSRF check, missing or invalid auth, a read-only key trying to change something, something that is not enabled for your account (Raise rules, or a product you do not have), or a write on a read-only account. |
| 404 | Not found: the object doesn't exist. This is also returned to hide objects that belong to another user. |
| 409 | Conflict: the action clashes with current state (the machine limit is reached, a label name is taken, or a 2FA step is out of order). |
| 422 | Unprocessable: a required field is missing or invalid (e.g. an unknown os_type or python_version, a name longer than 128 characters, a missing install attestation, or no OS set). |
| 500 | Server error: an unexpected failure on our side, including build or blob-storage problems. |
A 401 Unauthorized is returned specifically when an API key is bad, revoked, or
expired (see Authentication).
Glossary
A plain-English reference for the terms used throughout this guide. Each one is also defined where it first appears, but this is the quick lookup.
Untrusted data (taint)
Data that came from the outside world rather than from your own program, for example bytes read off a network socket, the contents of a file someone else can write, or text typed on standard input. EyalSec calls this untrusted data, and its internal name for it is taint. The two words mean the same thing. EyalSec tracks untrusted data as it flows through your program so it can tell when that data is about to be used in a dangerous way.
Source
Where untrusted data entered your program. For es-python the sources are:
- socket: data received over the network,
- file: data read from a file,
- stdin: data read from standard input,
- env: environment variables and command-line arguments,
- make_vuln: values you marked untrusted yourself,
- weak_random: values from the non-cryptographic random generator,
- hardcoded: credentials found in your source code,
- db_rows: values read back out of a database (second-order data: the way stored attacks reach a dangerous operation), and
- foreign: code loaded from a file that another user can write (see foreign code below).
Every source is off until you switch it on. You choose which sources EyalSec watches per machine; see Machine configuration.
Sink
A risky action: the dangerous thing untrusted data might end up doing. Common sinks are running a system command, executing code, or opening a file path built from outside input. EyalSec records (or blocks) the moment untrusted data reaches a sink. The pairing is the whole idea: a source brings data in, a sink could do harm with it, and EyalSec watches the path between them.
Report
The default behavior: when untrusted data from a source you switched on reaches a sink, EyalSec records an event on your dashboard and lets your program keep running. Nothing about how your app behaves changes. See Report mode vs Report and Raise mode.
Raise
The blocking behavior: instead of just recording, EyalSec stops the risky
action by throwing a Python RuntimeError at that exact spot, so the dangerous
operation never happens. Raise must be enabled on your account; see
Plans & roles.
Modes 1 / 2 / 3 / 4
The four "modes" a dashboard rule can have:
- Mode 1, Hide (UI): a display rule that hides matching events from your views.
- Mode 2, Show (UI): a display rule that shows only matching events.
- Mode 3, Raise (machine): tells the runtime to block matching events (Raise behavior). Mode 3 needs Raise enabled on your account.
- Mode 4, Don't send (drop): tells the machine not to send matching events at all; they are never recorded.
Modes 1 and 2 only change what you see on the dashboard; they never affect what's collected or how your program runs. Modes 3 and 4 change what the machine does. Every mode acts on the events its pattern matches. See Machine configuration.
Severity
A per-event rating (critical, high, medium, low, or info) computed on the server from what the event shows, so the rows that deserve attention stand out. Shown as a colored word on the Events page, and filterable there and in the API.
Socket-only build
A slimmer version of the es-python runtime that watches network data only: it cannot watch the file, stdin, foreign, or env sources. It is no longer selectable when adding a machine (new machines always get the full build), but some older machines still run it and show a socket-only badge. See Machines.
Origin
The file metadata of the data's source: details about the file the untrusted data came from, such as its type, permissions, size, owner, and timestamps. Origin helps you judge whether a file should have been trusted in the first place. It appears in an event's detail pane.
Foreign code
Python code loaded from a file that another user on the machine can write to.
If a file you import or run could be modified by someone other than you, that's a
risk: they could change what your program does. When foreign-code detection is
on, loading such a file emits a foreign-code:<path> event, and under Raise it
aborts the load. See Running es-python.
public_id vs secret
Every machine has two identifiers:
- public_id: a safe, shareable handle for the machine. It's what the dashboard and API use to refer to a machine. Showing it to someone reveals nothing dangerous.
- secret: the machine's private token, used by the agent to prove which
machine it is when it talks to the server. For es-python the secret is
never shown in the dashboard. For products whose install panel has an
Environment field, that field is this token (
ES2_TOKEN), shown masked when you add or reinstall the machine. Treat it like a password.
Build version
A short label identifying exactly which build of the es-python runtime a machine
is running. The dashboard compares the build installed on a machine against the
latest available build and shows an "up to date" or "newer build available"
badge. To take a newer build, reinstall the machine; see Machines.
API key
A token (it starts with es2_) that lets a program talk to the dashboard's JSON
API on your behalf, without a browser login. You generate one in
Settings; it's shown only once, so save it somewhere
safe. An API key has the same access your account does.
CVE
Short for Common Vulnerabilities and Exposures: the industry-standard naming
scheme for publicly known security flaws (for example, CVE-2021-44228). When
people talk about a specific known vulnerability, they usually refer to it by its
CVE identifier.
FAQ & troubleshooting
Quick answers to the questions that come up most. If yours isn't here, see Getting help.
Do I have to change my code?
No. You run the same programs the same way, just with es-python instead of
python. EyalSec watches from the runtime; your source code stays exactly as it
is.
Will Report and Raise mode break my app?
Only if untrusted data actually reaches a risky action. For normal traffic
nothing changes; Report and Raise mode only steps in at the exact moment something dangerous
is about to happen, and it does so by throwing a normal Python RuntimeError. If
your code already catches exceptions around that operation, the attack is blocked
and your app can carry on. Many people start in Report mode
and switch to Raise once they're confident in what EyalSec is detecting.
I don't see any events. What's wrong?
Check these things in order:
- You ran your program with
es-python, not plainpython. - The machine shows as installed (green) on the Machines page.
- You don't have a filter or rule hiding the events. Check
Filters and the Events filter toolbar, and remember
that new accounts start with two default "Don't send" drop rules
(patterns
reandwrite); events whose name matches either are dropped at the machine until you edit or remove those rules (see Filters). - The sources you care about are switched on for that machine. Taint sources are off until you enable them; see Machine configuration. Remember that taint changes take effect on the next process restart.
- Your account has a plan. An account with no plan yet has no visible events; see Plans & roles.
How do I go back to normal Python?
Just use python as you always have. EyalSec is added alongside it, so your
original Python is always still there. Switching between python and es-python
takes nothing more than which command you type.
How do I update a machine to a newer build?
When the dashboard shows a "newer build available" badge on a machine, you
update it by reinstalling it. On the Machines page, click
Install on the machine's row. That mints a fresh install command for you to
run on the host, which pulls down the latest es-python build. Your machine's
internal identity is unchanged, so all your existing events stay attributed to it;
nothing is lost. Reinstalling is the normal, expected way to take a newer build.
Why can't I create a Raise rule?
Raise rules (mode-3 rules that block an action at runtime) must be enabled on your account. If they aren't, you'll see:
Raise rules are not enabled for your account. Ask an administrator to enable them.
Report mode works for every account;
only blocking (Raise) needs the capability turned on. To have it enabled, email
sales@eyalsec.com. See Plans & roles.
I registered, but my dashboard says I have no active plan. What now?
Registering and verifying your email gives you a working sign-in, not an
allowance. Until a plan is set up for your account it has no machines and no
visible events, so adding a machine is refused and the events lists are empty.
Email sales@eyalsec.com to book a live demo and have your plan sized. The
limits apply the moment we set them, with nothing to reinstall. See
Plans & roles.
How do I use the API?
EyalSec has a JSON API that mirrors what you can do in the dashboard. To use it:
-
Generate an API key in Settings. It starts with
es2_and is shown only once, so copy it somewhere safe. -
Send it on each request in the
X-API-Keyheader, like this:curl -H "X-API-Key: es2_3f9a…" https://eyalsec.com/api/get_all_machines/
API-key requests always return JSON and never redirect to a login page. A full-access key carries the same access your account has (a read-only key can only read), so keep it private. For the full list of endpoints, see the API reference.
I lost my 2FA device. How do I log in?
When you set up two-factor authentication, EyalSec showed you a set of backup
codes (in the form xxxx-xxxx-xxxx-xxxx). Each one works exactly once in
place of the 6-digit app code on the two-factor screen (choose Use a backup
code instead), and they're not case-sensitive. If you turned on email sign-in
codes, you can also have a code emailed to you from that screen. Use one to get
in, then go to Settings to re-enroll your
authenticator on your new device and regenerate a fresh set of backup codes. If
you've also run out of backup codes and can't get in at all, email
support@eyalsec.com. See Getting help.
Getting help
Still stuck, or want to talk to a person? We're here.
- Support: questions, problems, or anything that isn't working the way you expect: email support@eyalsec.com.
- Upgrades: for more machines, a higher event quota, another product, or Report and Raise mode: email sales@eyalsec.com. See Plans & roles for what your account includes.
Before you write in, the FAQ & troubleshooting section answers the most common questions, and the Glossary explains any term you're unsure about. If you do reach out, telling us which machine and roughly when something happened helps us help you faster.